
Learn how to build a Field Form on the PeerAssist Platform.
Create forms for the field to use on any of their projects. There is a library of form templates you can use or modify, or you can create your forms from scratch.
Table of Contents
- Download a form from our library
- Create a New Form
- Form Sections Explained
- Comment Types
- Response Required
- General Settings
- Copy a Form
Download a form from our library
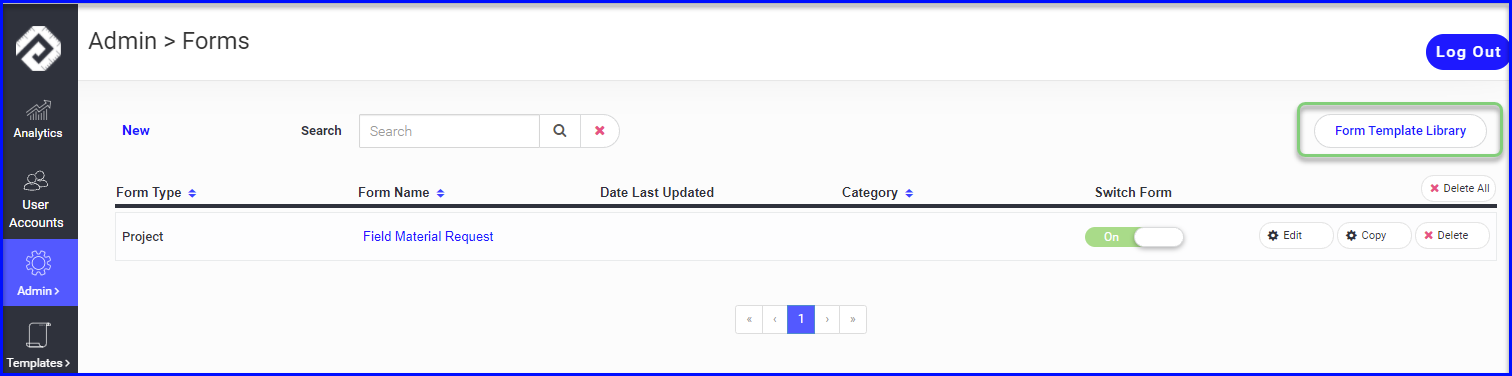
There are several forms available for your use in our Form Template Library. For detailed information on these forms, read here.
To access the forms, navigate to Admin > Forms and click the Form Template Library button.
From there you can:
- Search and Filter to narrow the view
- Preview a PDF of the form
- Select multiple forms to Download.

The downloaded forms will show up in your Admin > Forms dashboard and will need to be "switched on" to be made available for use in the field. You can download these templates and edit to customize to your needs.
You can also build a custom form from scratch! Simply add sections, select a response type, and list the questions or items within the section.
Create a New Form
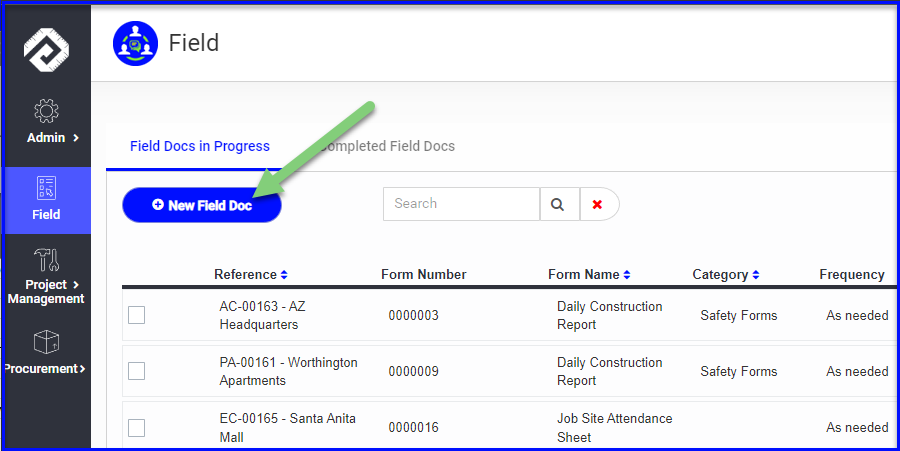
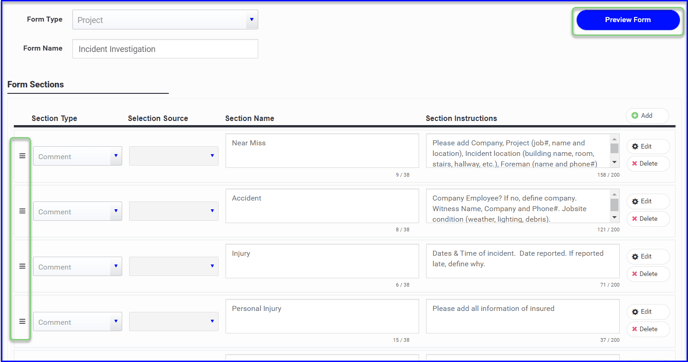
It is easy to build a new form from scratch! Just add sections and then line items within each section. Preview the form as you go, and drag-and-drop to easily rearrange sections.- Navigate to Admin > Forms and click on +New Field Doc
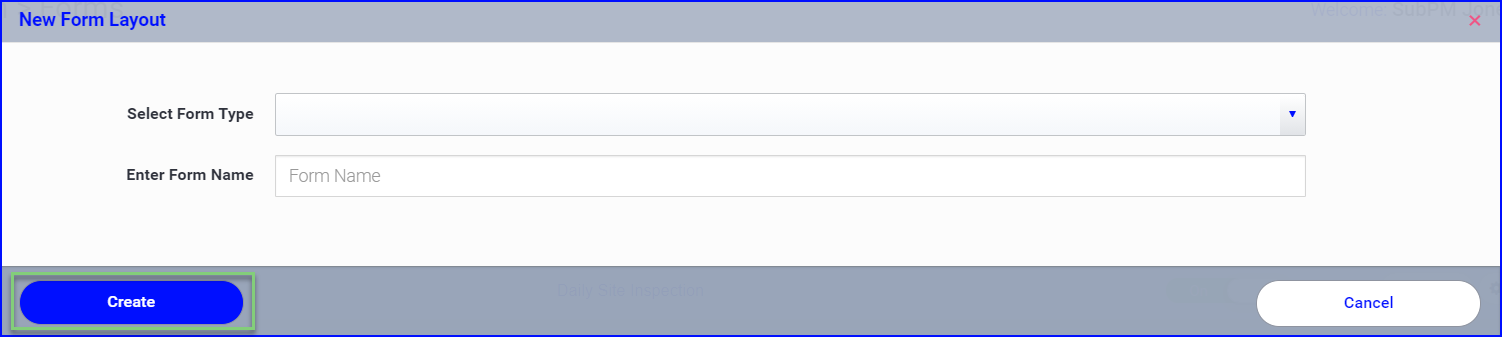
- Form Type should be Project
- Enter Form Name - Give the form a name
- Create
Add sections to the form
-
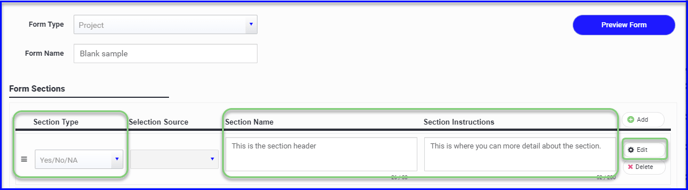
Click on Add to add a new section to your form.

- You will need to select the Section Type, Section Name & Section Instructions
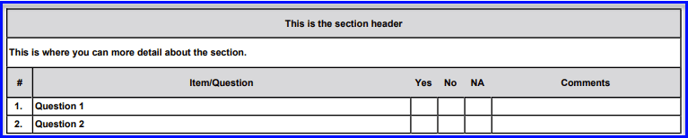
- See next two photos to see how the section fields are displayed on the form preview
- Read about the section types below
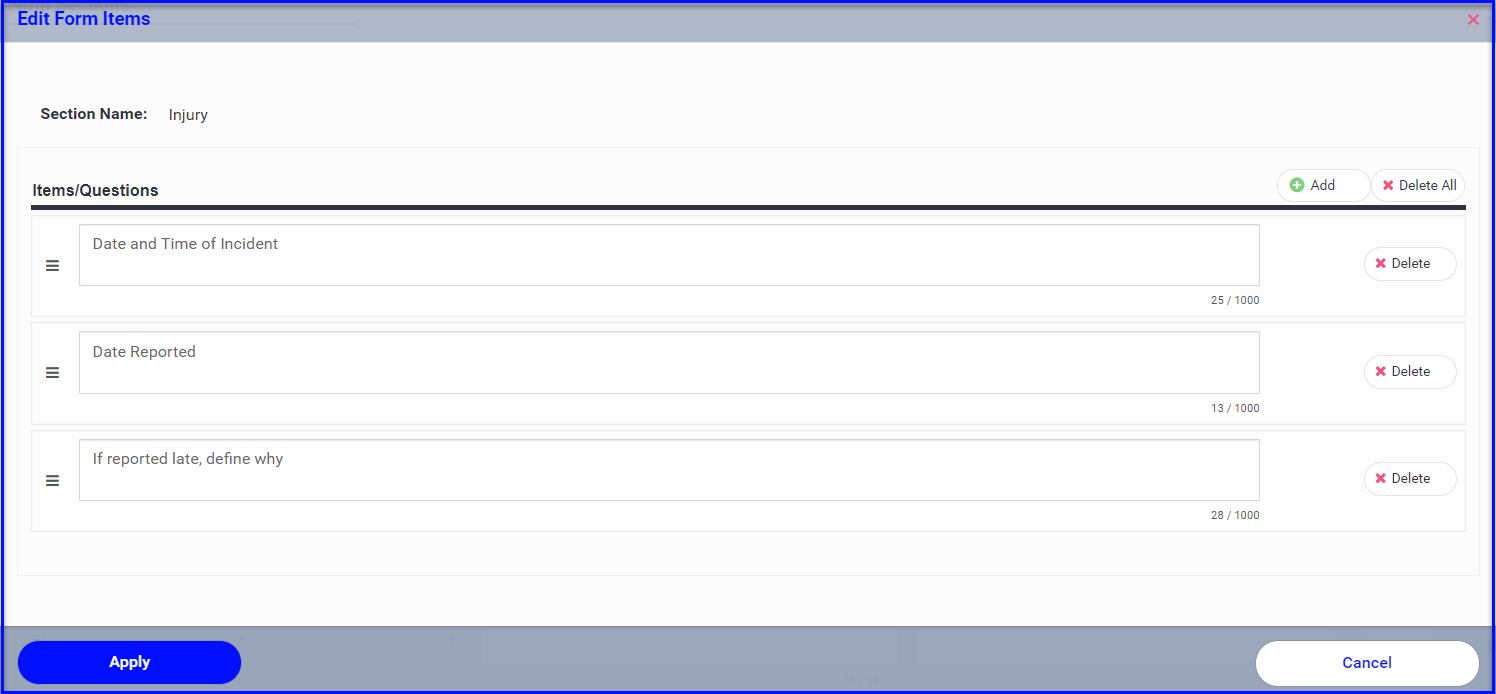
- Edit the section to add questions or line items within the section
- Use the green + to add additional lines
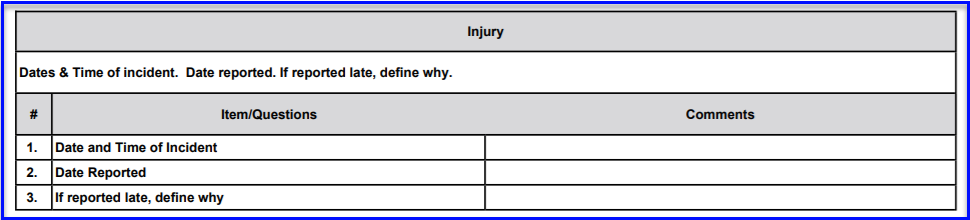
- In this example, the line items are related to an incident report with responses are in the form of a "Comment" section type. See preview in the 2nd photo to see the correlation.
- You can Preview the form at any time during the process to see how it is formatted
- Add as many sections as needed and drag-and-drop to rearrange before saving your form
Section Types Explained
The section type dictates the type of response needed, e.g. Yes/No/NA check boxes or Comment to key in a response.
NA/S/C - Not Applicable, Satisfactory, Correction needed. An example of a use for this would be for safety type inspection questions presented to the user e.g. "Check for overhead obstructions".
Comment - This is a simple note type response to a question on a form. This could be used when an event needs to be described e.g. "Provide a summary of the incident", "Provide a detailed description of the Incident", "What damage resulted from the incident?' You can also indicate if a Comment response should be in the following formats: text, numeric, date, time, currency, or a selection from a custom list.
Item Selection - This section type is connected to a master list and allows the user to select an item from it. Currently this is connected to the material master list of the company or project. One use for this section can be for creating a material request from the field or taking a tool inventory on the job site.
Employee Selection - This section type allows you to list several employees at one time. Each name is listed next to its own comment box. Use this section type to note who will be working on the job site for the day, or to list who is approved to use specialized equipment for example.
Employee Selection w/ Signature - This section type is allows you to list several employees and capture their signature, a date and timestamp, as well as comments. Use this section type for Daily Attendance sheets, Sign In/Sign Out Forms, or Company Acknowledgements.
Text Selection - This text section type allows you to add a larger “statement type” of paragraph without the addition of the comment section. Use this text box for company policy, HR or covid health assessment statements. Combine the use of the text box with other section types like employee signature to help employees acknowledge they’ve read and understood the statements presented. Paragraph Section - this is a blank section for the user to fill out lengthier responses to a single question, e.g. description of work complete or an RFI question. There are no questions within a paragraph section, but you can add a new paragraph section for different questions/responses.
Comment Types
For "Comment" Section Types, while adding or editing the questions you can indicate if the response should be in text, number, day, time or currency format. This will change the way the mobile device allows the user to enter the response (e.g. a number response will open the number keypad, or a day/time response will open a widget to easily make a selection). Additionally the responses will be properly formatted on the completed form (e.g. currency will have commas and decimal places, and time will show colon and AM/PM).
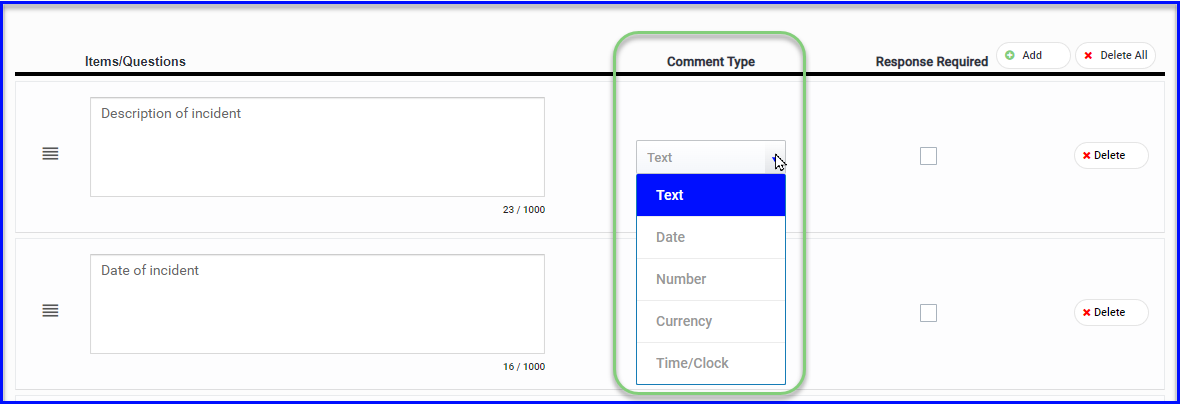
If you would like to customize a dropdown for the user to choose from, use the "Select from list" Comment Type. Then you can specify which dropdown list to use in the Comment Source. The list should already have been created in Admin > Custom Lists (learn more here).

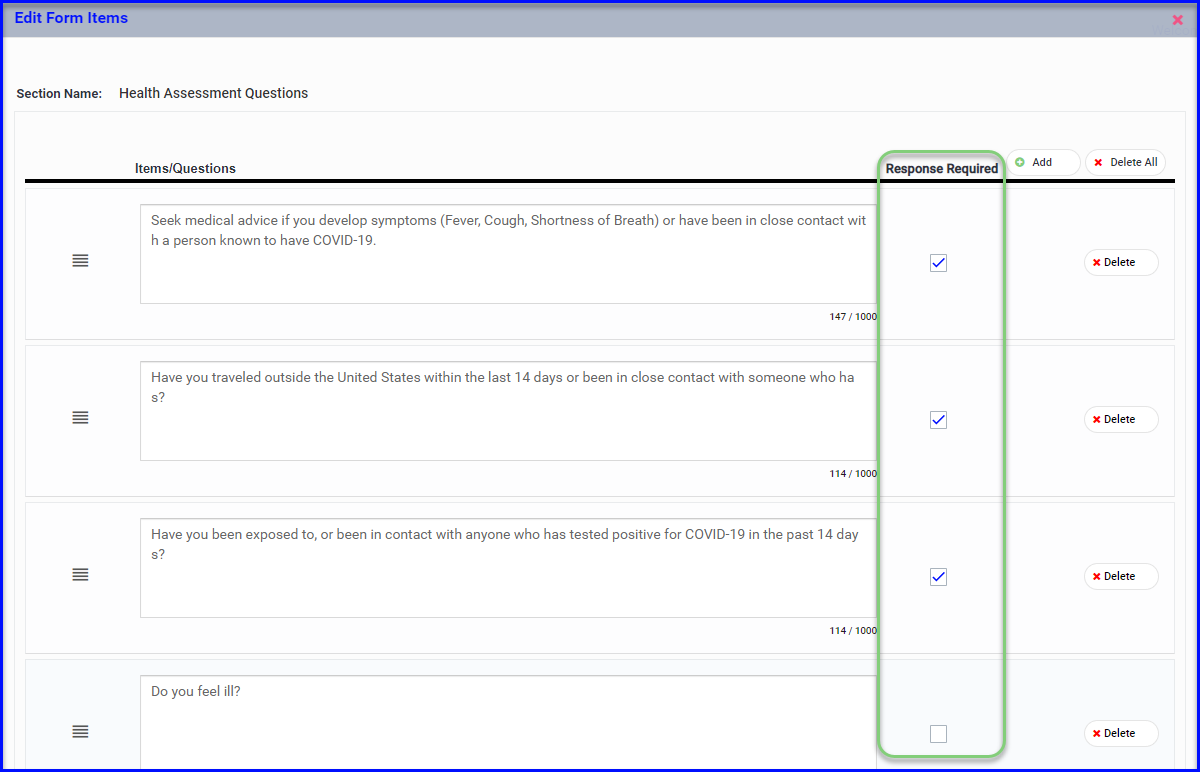
Response Required
When adding or editing questions within a section, you have the option to make a response mandatory so that the form cannot be completed if that field is blank.
We are more than happy to assist you with building your forms using our system. Simply send a PDF of your form to support@peerassist.com and we can build it and send you an example of how it would look using Field Forms
General Settings
- Scroll to the General Settings for the form
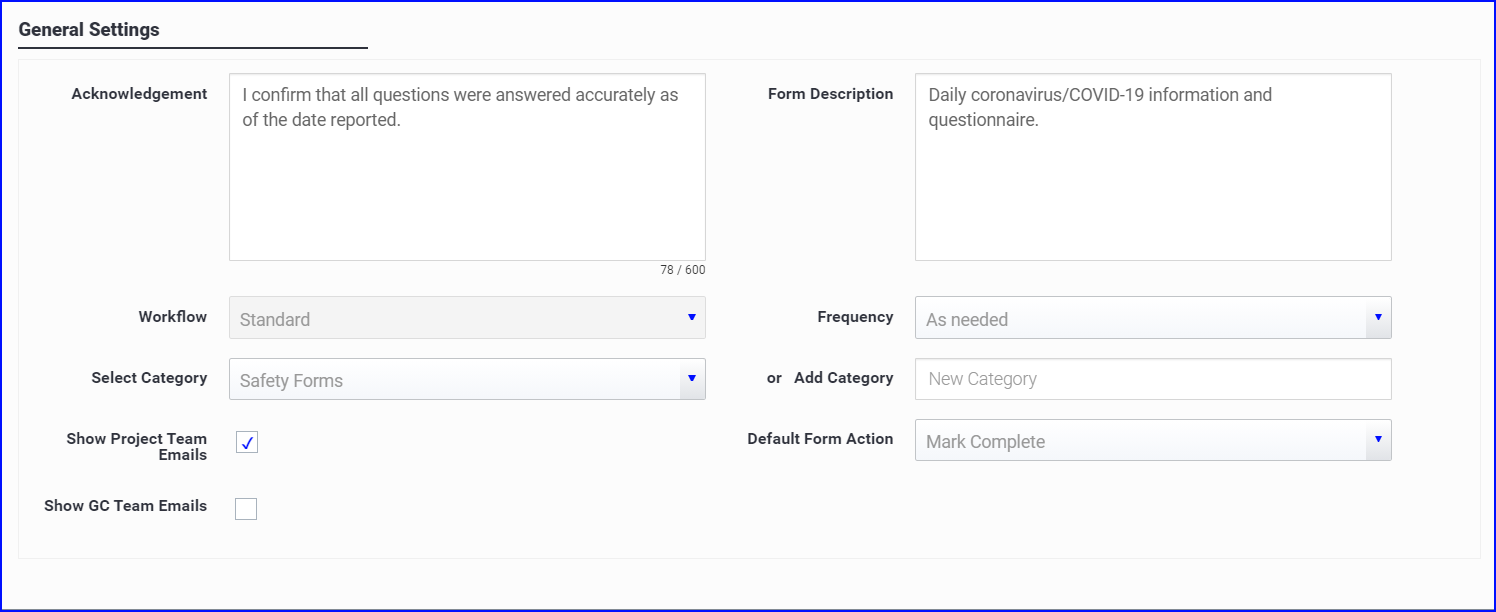
- The general setting fields are explained as follows:
- Acknowledgement - this is the text that will show up on the form when it is signed.
- Form Description - a simple description of the form for informational purposes only.
- WorkFlow - Currently set to Field but as more Workflows are created, this will be selectable.
- Frequency - this indicates how often this report should be completed.
- Select Category or Add Category - organize your forms into different categories such as Safety Forms, Equipment Inspection Forms etc.
- Show project team emails - certain forms do not require the project team to be included.
- Default Form Action - when the form is completed on the iPad the user has options to Send for Signature or Mark Complete. This setting allows you to define which one should be the default.
- Show GC Team Emails - check this box if the form needs to be signed by the GC or the GC should be copied when the completed form is sent.
- If it requires a GC signature, make sure that you have also selected the "Send for signature" Action Type
- Form Contacts - You can add a person, people or department that needs to be copied anytime a particular form is completed. They do not need to be added to the project and will not receive any other unrelated correspondence.
- Switch On/Off
- If there is a form that is no longer needed you can Switch Off the form in the Admin > Forms dashboard and the field will no longer be able to access it.
- To make your form Active, set its status to On
- To make the form Inactive, set its status to Off

Copy a Form
Any form can be copied and then edited. This is very useful for forms that are very similar in format and just need changes to the questions being asked.
- Click on Copy on the form you wish to use.
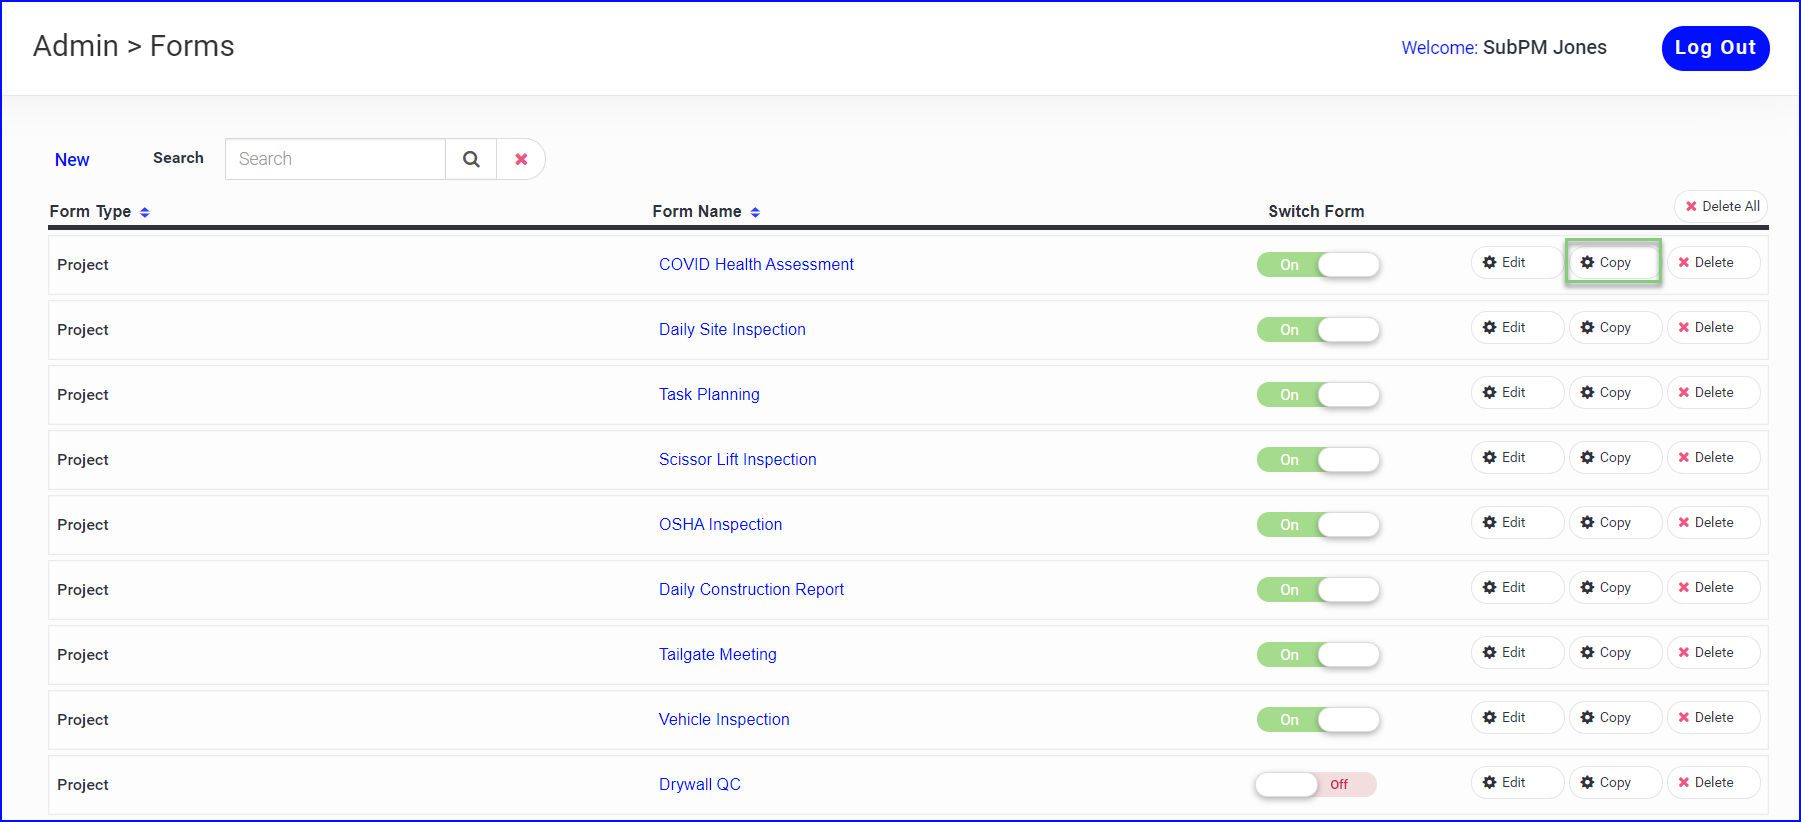
- The copy of the form will appear at the end of the list of forms

You are ready to deploy your forms to your users!
After building your forms, you are ready to deploy and have your job teams start completing their reports!