Learn how to track T&M on the mobile app
TipTickets can be created on both the mobile app or the website. We recommend using the mobile version which allows you to capture the GC signature in the field.
If you are not sure if the work is out-of-scope or if it's supposed to be tracked on T&M, you may instead create an Authorization Request (a description of work without time & material), and when approved it will automatically show up as a ticket on your mobile dashboard ready for you to start adding labor & materials.
Table of Contents
- Start a New Ticket: Details & Photos
- Adding Labor
- Adding Material
- Capturing Signatures
- Don't forget to Save and Refresh
Start a New Ticket
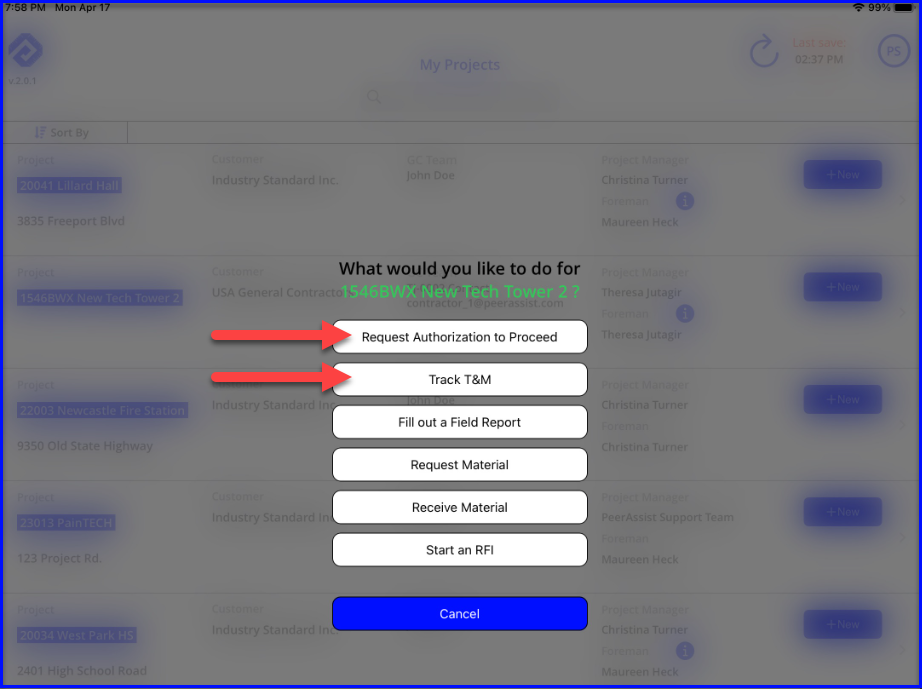
- From the My Project starting page, tap +New on the corresponding project, and then select Track T&M (or Request Authorization to Proceed)
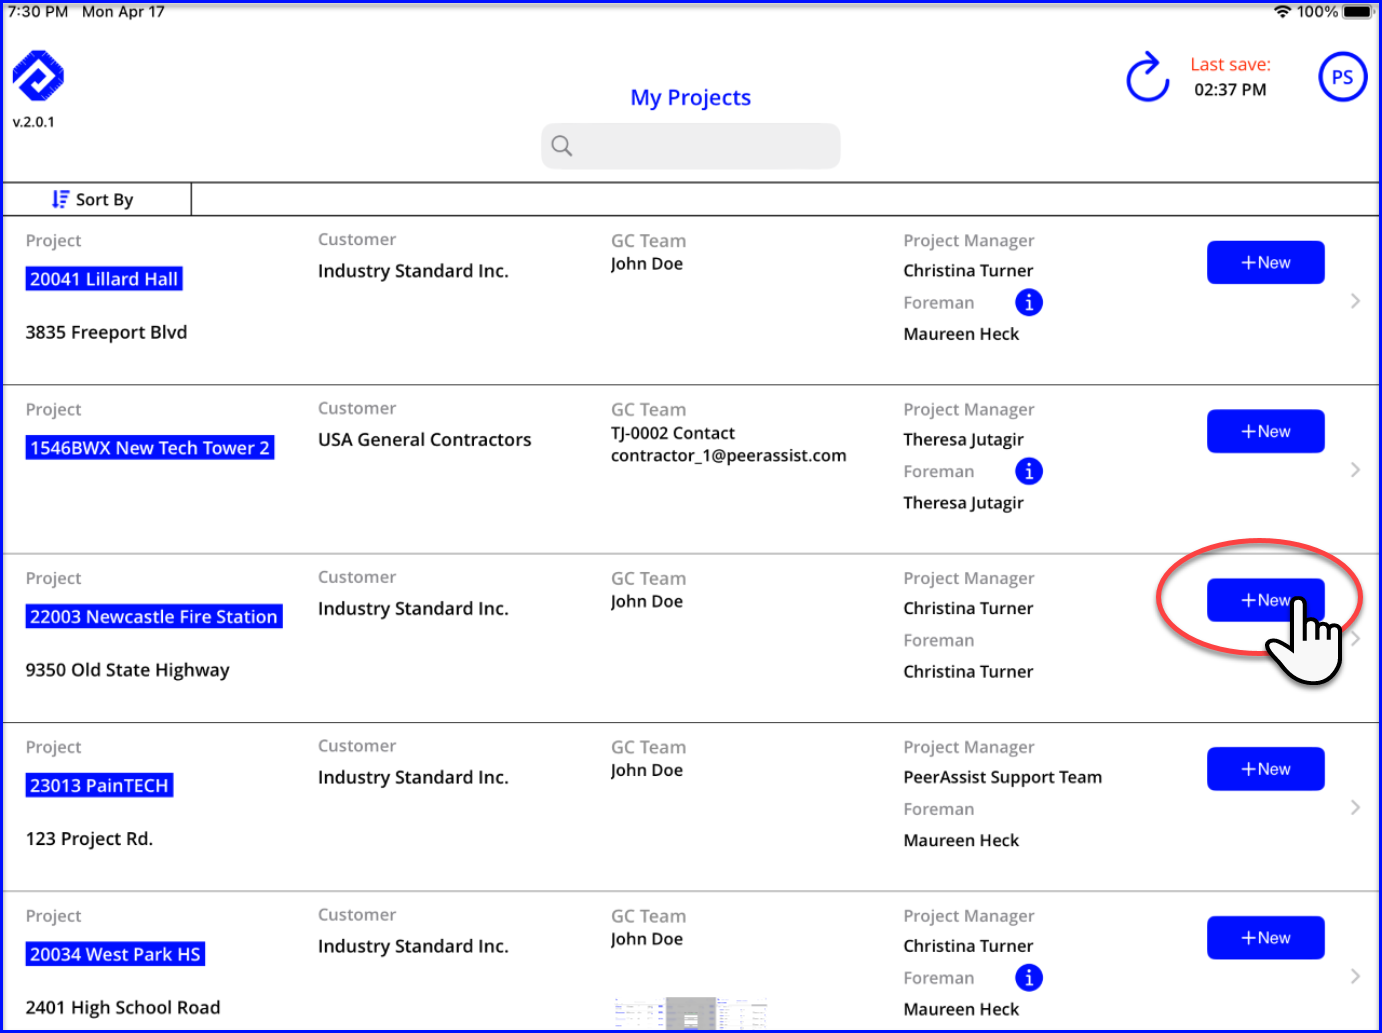
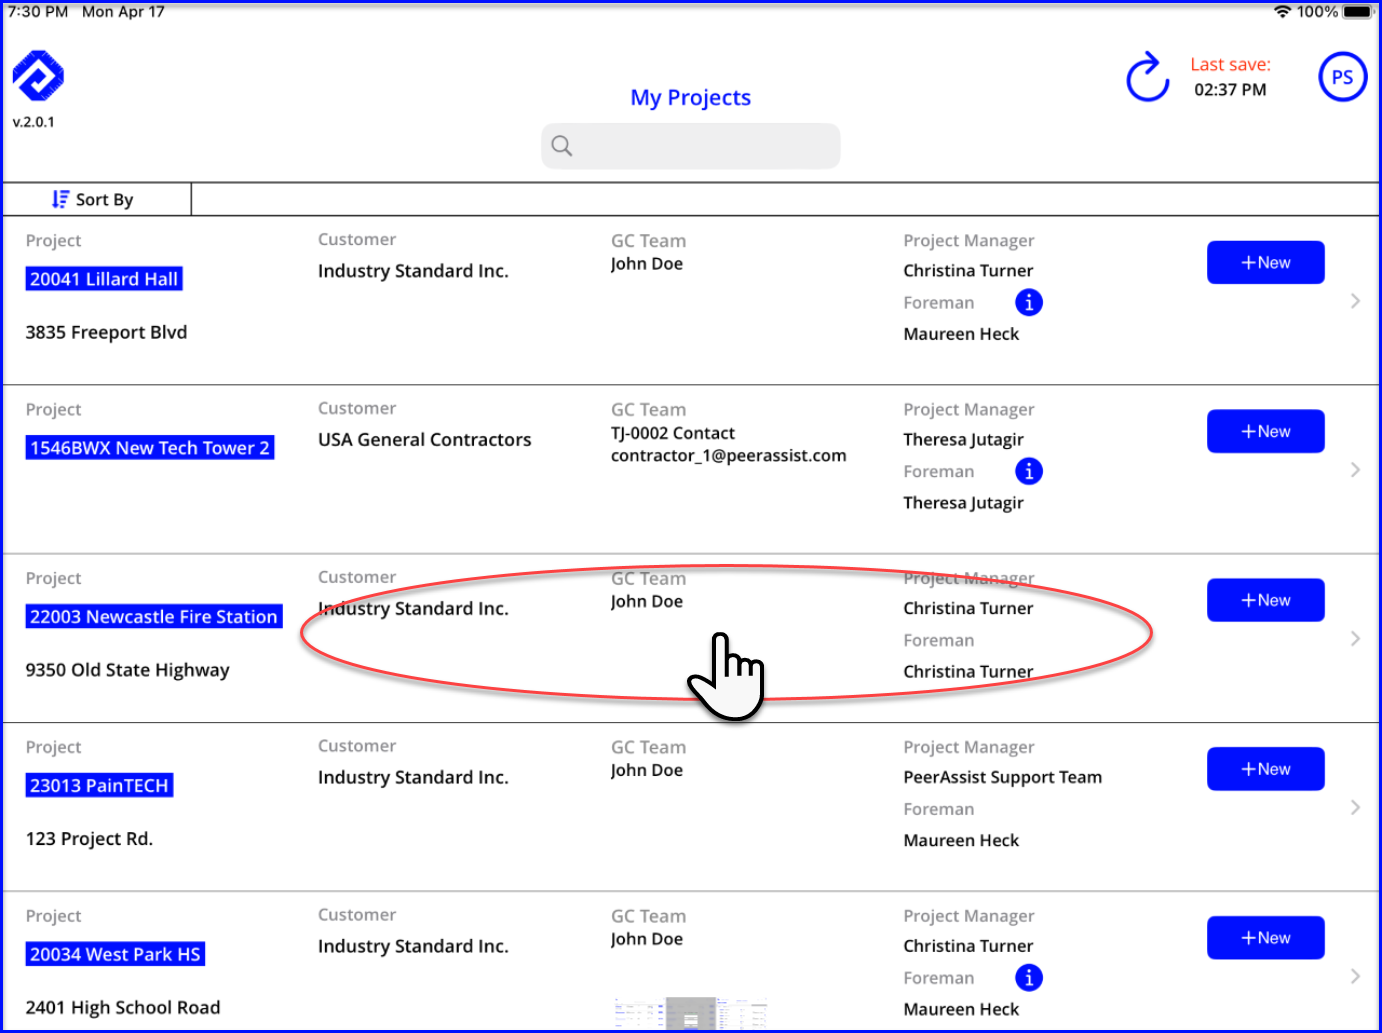
- Or, tap anywhere on the project row and then choose the Ticket tab and +New Ticket (or +New Authorization in the Authorization tab)

Add the Summary & Description of Work
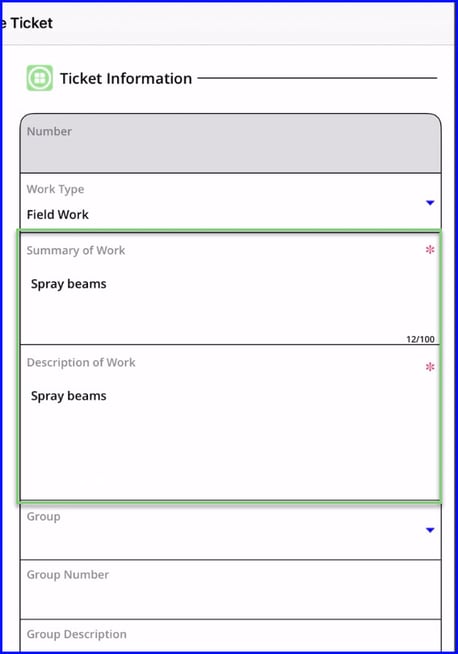
The only true requirement when creating a ticket is to fill out a summary and description of work.
-
- Summary of Work (R) - A brief description of the work 100 characters or less. This will appear on your dashboard.
- Description of Work (R) - A longer description of the work (this will appear on the ticket & change order request). Be sure to include area details, sheet numbers, or the name of the person directing the work. You can come back to update and add to the description for as long as the ticket is open.
Add Pictures and Annotate
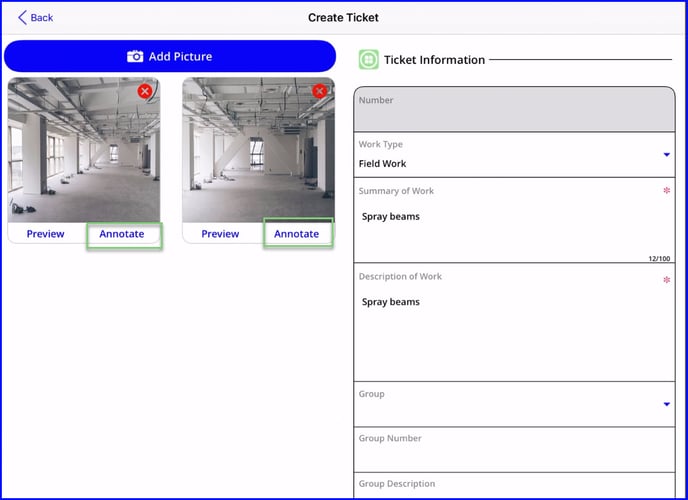
Including photos is helpful in getting paid for extra work. You can take a live photo or choose something from your camera roll, as well as annotate to keep track of room numbers or point out damage.
- Tap on Add Picture
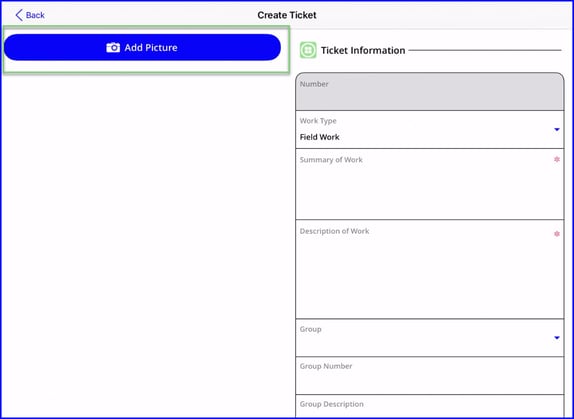
- When you use the application for the first time, you will be prompted to allow access to your photos. Tap on Allow Access to All Photos.
- Select photo(s) from your device's library, or take a live photo by tapping on the camera icon. Tap on Done when the pictures have been selected.
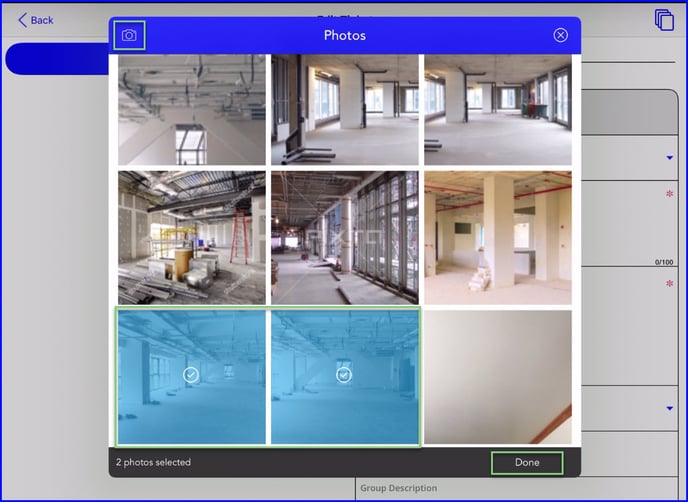
- The pictures will display on the T&M ticket screen and can be annotated by tapping on Annotate for the picture you wish to edit.
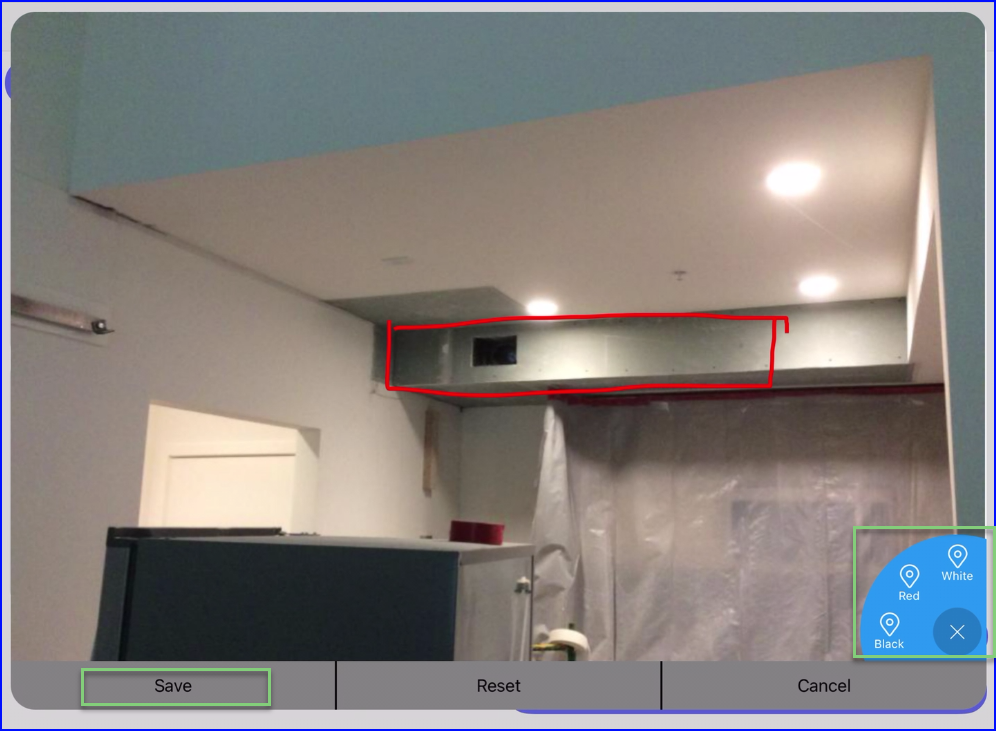
- Pick a color and draw on the image to highlight the area you wish to call attention to. When completed tap Save.
Set the Work Type
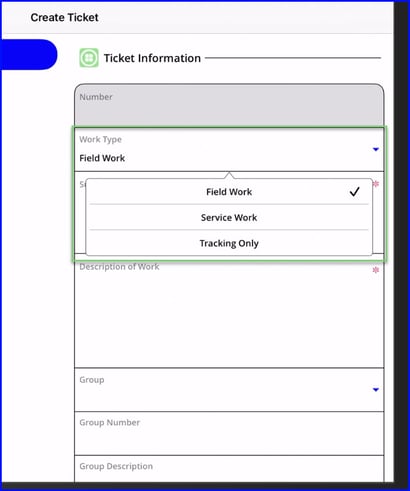
Most contractors will have their tickets default to Field Work, but you can change the work type if needed:-
-
- Field Work: creates a Change Order Request
- Service Work: creates an Invoice
- Tracking Only: for internal reference only and not for billing (for example: if the PM wants to keep track of overtime or other tasks that there is an allowance for)
-
Organize Tickets with Groups, Categories & Reference Numbers
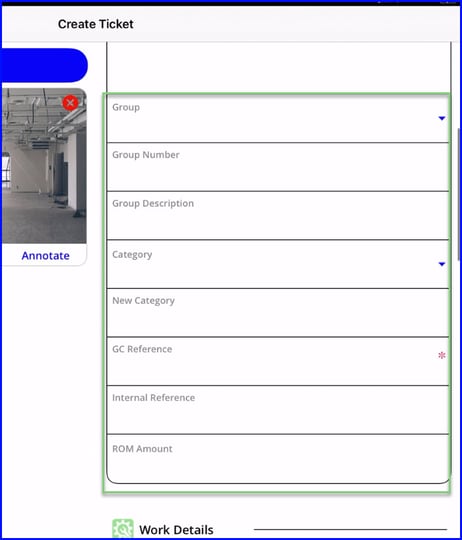
Everything below is optional and can also be done by the PM or Admin on the desktop version. However, the more information the field provides makes for better communication and use of filters!
-
- Group (O) - Multiple tickets can be grouped onto a single change order. The field has the ability to group tickets or this may be controlled by the PM from the office.
- Group Number & Group Description (O) - Create a new group if needed (again, this may be done on the office side)
-
- Category (O) - To categorize your work, select from the drop-down
- New Category (O) - Add a custom category to the dropdown (for example: RFI #12 or Bulletin 2 Drawings, or location/task-specific work such as STC Upgrade)
-
GC reference (O) - If the GC provided a reference number to use for this work (such as an RFI or PCO#) then enter this here.
-
Internal Reference (O) - If your project team needs to use an internal reference number for the work, this can be used for that purpose.
-
ROM Amount (O) - Indicate if a ROM has been provided, this may be done on the office side.
Save Your Work -or- Continue with Adding Time & Material
Now that you have entered a description, photos and basic ticket details, you can do one of the following:-
- Create - to save the new ticket without adding labor and material
-
- Preview - Preview the information on the Ticket
-
- Ticket Details - Proceed to adding labor, materials and obtain signatures
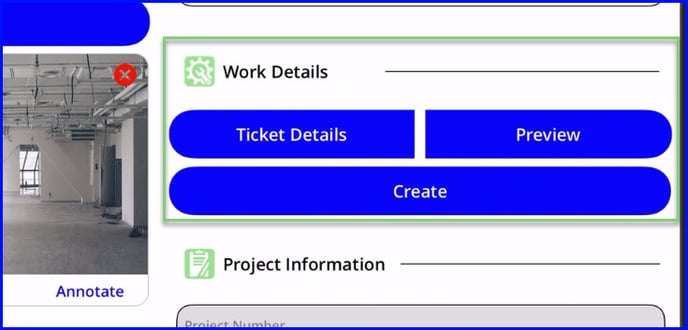
-
If you tap Create to save the ticket, an email prompt will display internal and GC team members that will be notified that a new ticket was created.
-
Select/Deselect or +Add people to the distribution and Confirm to send
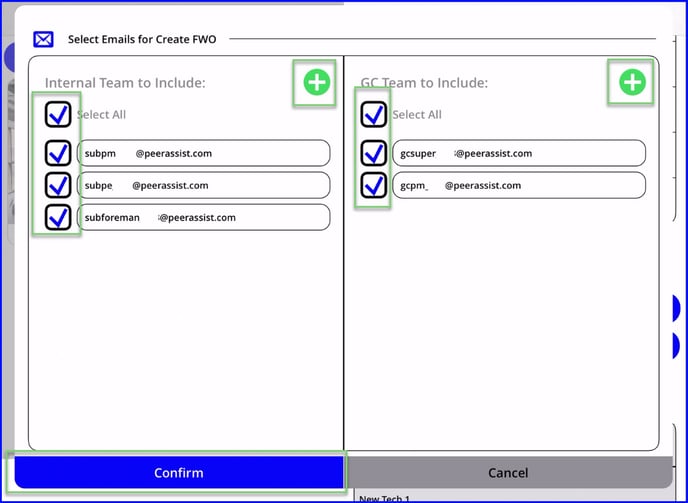
This email form will not show if the project settings have the email switched off.
- Or you can tap Ticket Details to proceed with adding labor and material
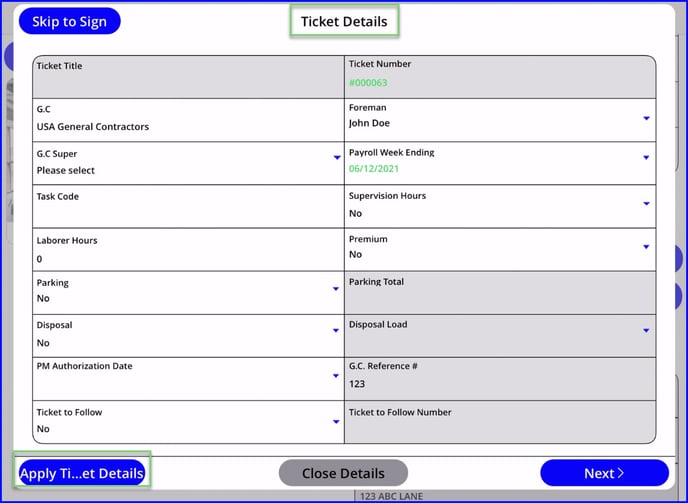
- The next screen will recap project details and any detail already added to the ticket
If necessary you can adjust the following:
- Foreman - The foreman working on the ticket - this defaults to the person who created the ticket initially
- GC Super - Select from the list of GC contacts who is the GC supervisor for the work.
- Payroll Week-ending - Enter the payroll weekending date for the work (you will be able to indicate week-ending dates when adding labor as well).
- Task Code - If you wish to track the work under a specific task code, enter it here
- Supervisor hours - Mark yes/no to mark whether supervisor hours were used for this work.
- Laborer hours - This is auto-filled when labor is added to the ticket.
- Premium - Set to Yes if the work is premium time only and the appropriate rate will calculate on the backend
- Parking - Set to Yes and it will unlock "Parking Total" for you to enter an amount
- Disposal - Set to Yes and it will unlock "Disposal Load" for you to indicate 1/4, 1/2, 3/4 or Full Load
- PM Authorization date - The date when the work was authorized if applicable.
- Ticket Number to follow - Set to Yes and it will unlock "Ticket to Follow Number" for you to enter the corresponding ticket number
Tip! If you previously entered the time & material and are ready to get the signature, you can tap Skip to Sign from any screen to bypass the labor & material sections.
Add Labor
- Tap Next to begin adding Labor
- Tap on the green "+" button on the upper right of the form to add a new labor entry.
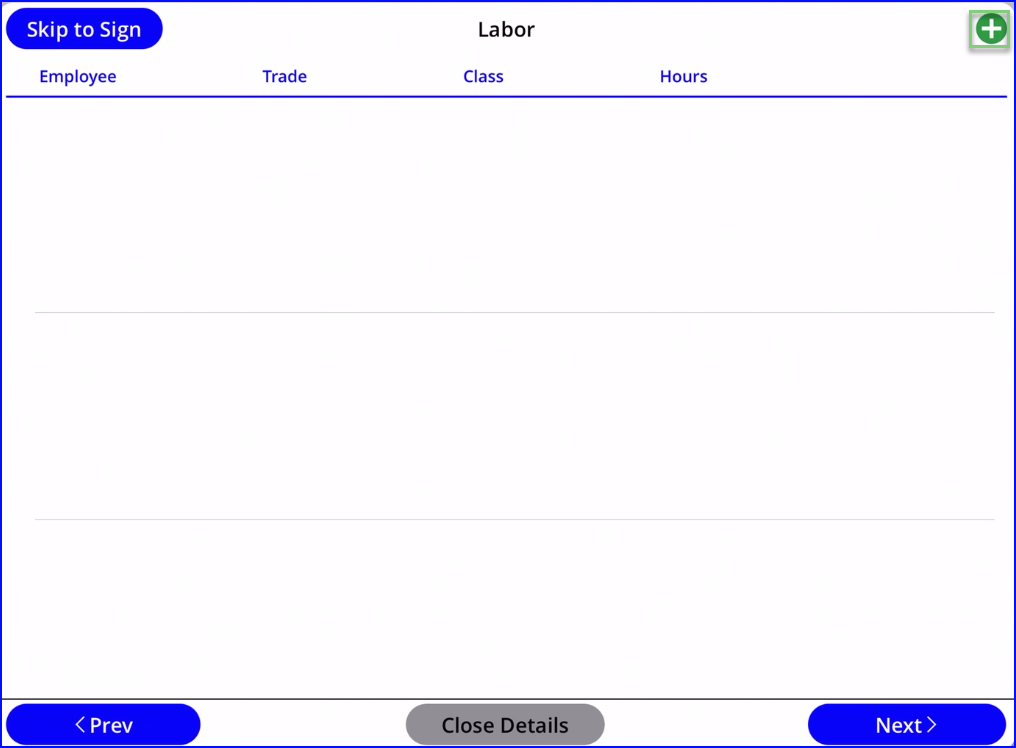
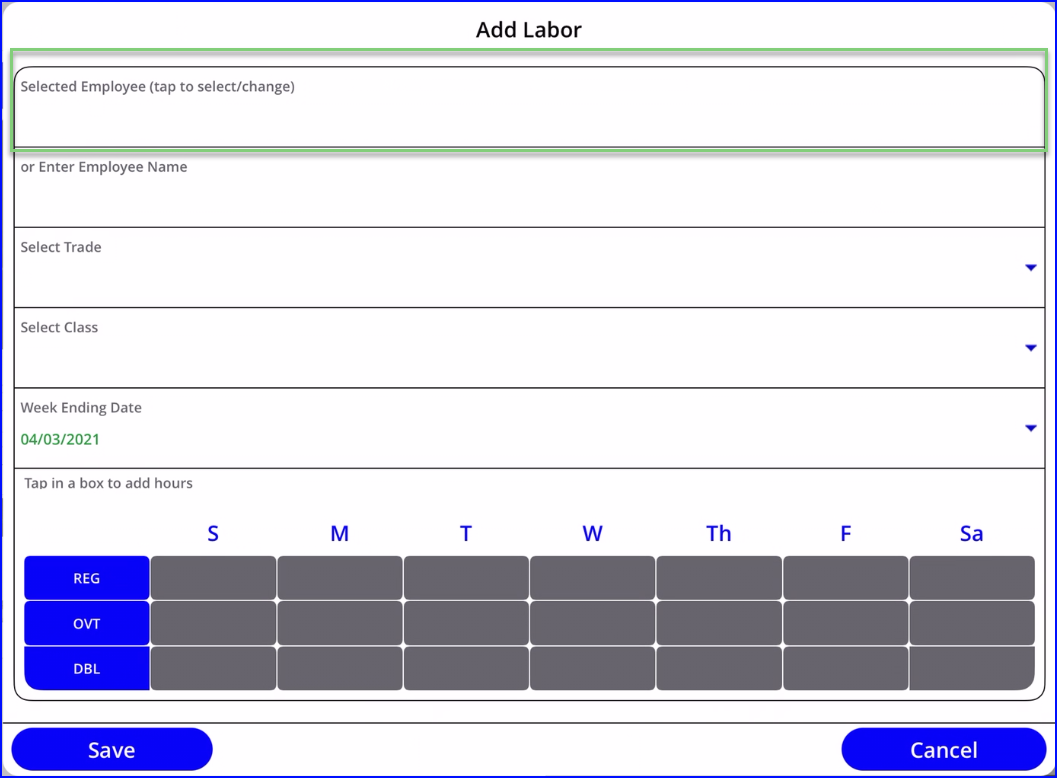
- Tap Selected Employee to search/select an employee from your list, or manually enter a name in Enter Employee Name
- Select the employees Trade and Class (these are set by the Admin and will populate the correct rates on the backend, if you have any issues with the trades and classes available to you, please notify your Admin)
- Adjust the week-ending date as needed (you can have multiple week-endings on a ticket, just start a new labor entry for each employee for each week-ending)
- Enter the hours worked in the appropriate cell (combination of day of week and regular/overtime/doubletime)
- Save to add the entry and continue adding labor
Tip! If you have a group of employees and want to log all the hours on one line, simply type in the Employee Name a description such as "Journeyman hours" and then enter the total hours for the group.
- After adding a labor entry, you will be taken back to the main list
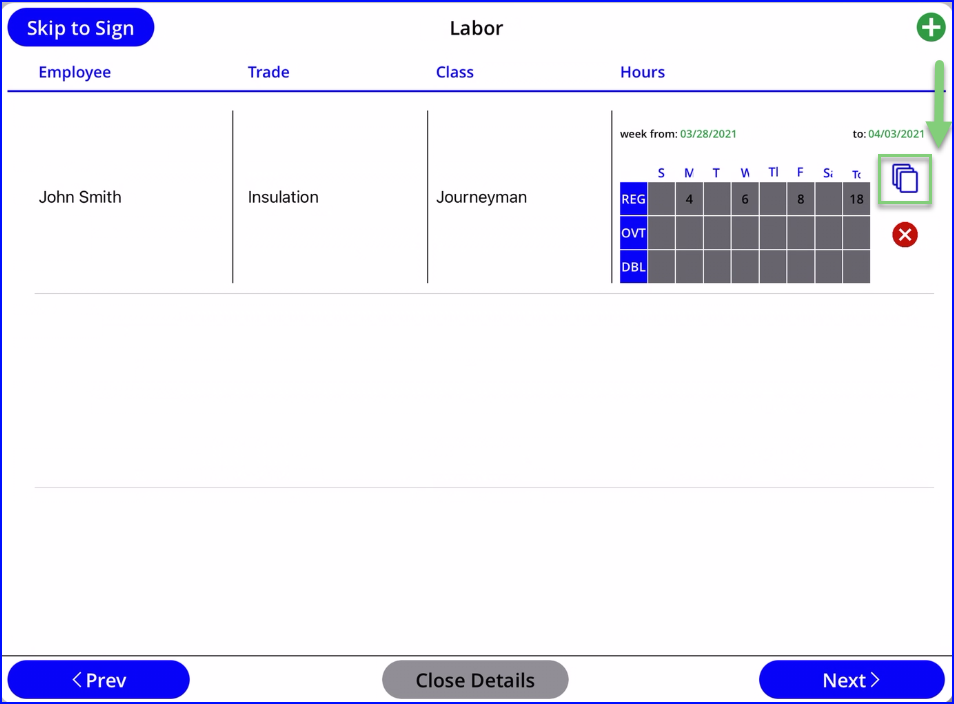
- You can use the green plus + to continue adding labor in the same manner, or...
- To save time, Copy a labor entry and change details as needed.
- For example, if Jose worked the same day and hours as another worker, you could Copy their entry and then change the name (and trade/class if necessary).
- Or, if John worked the same hours the next week, Copy the first entry and change the week-ending date.
- Tap Close Details to save changes and keep the ticket open, or
- Tap Next to continue on to add material
Adding Material
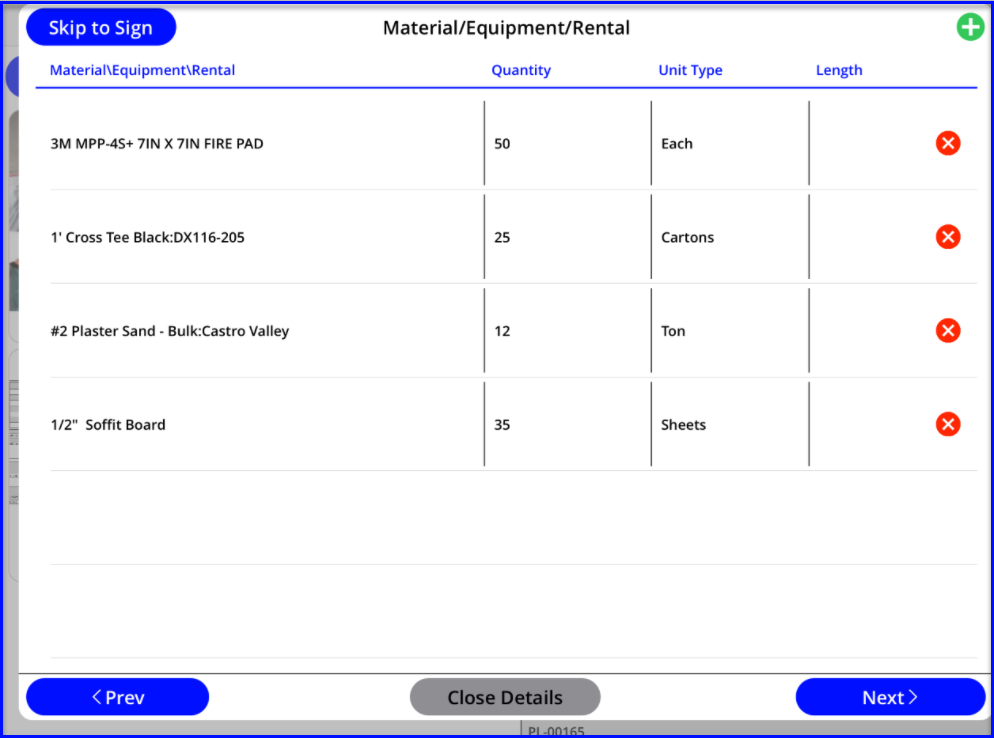
- Tap on the green plus + to begin adding material to the ticket
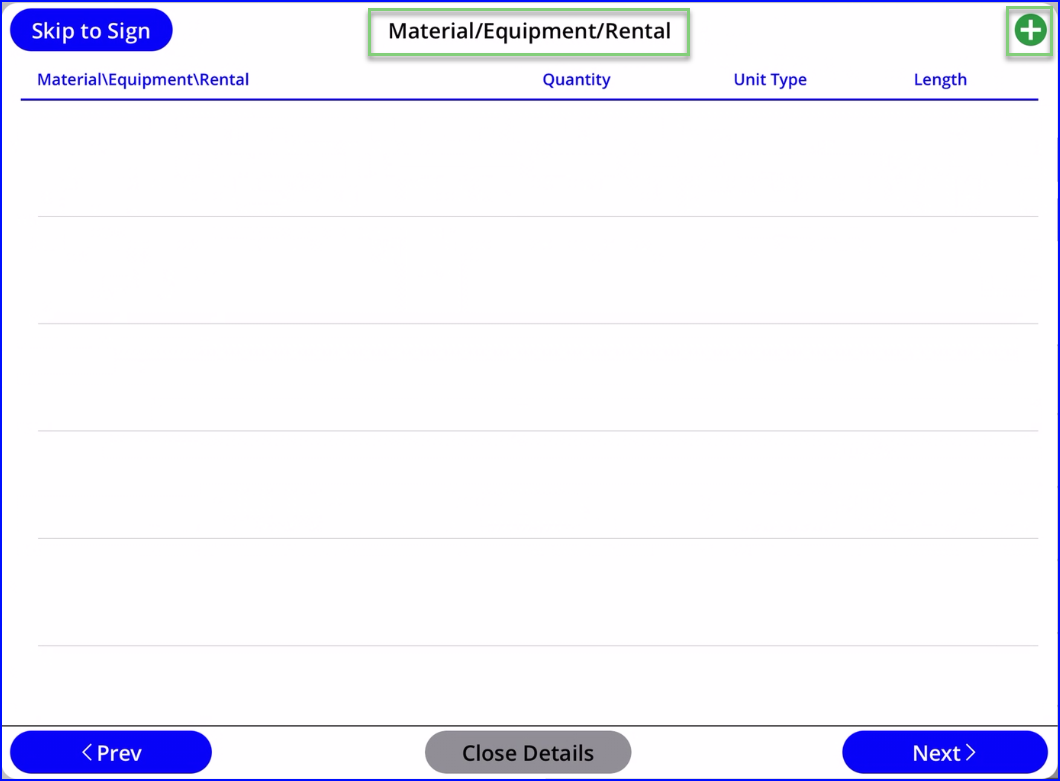
- You can search and choose material from a list with Select Items, or manually enter the item in Custom Item.
- A Quantity and Unit Type is required for all items added (Unit Type may default but can be changed if needed)
- Add any other detail that will be helpful to the office in pricing the material
- Save the entry
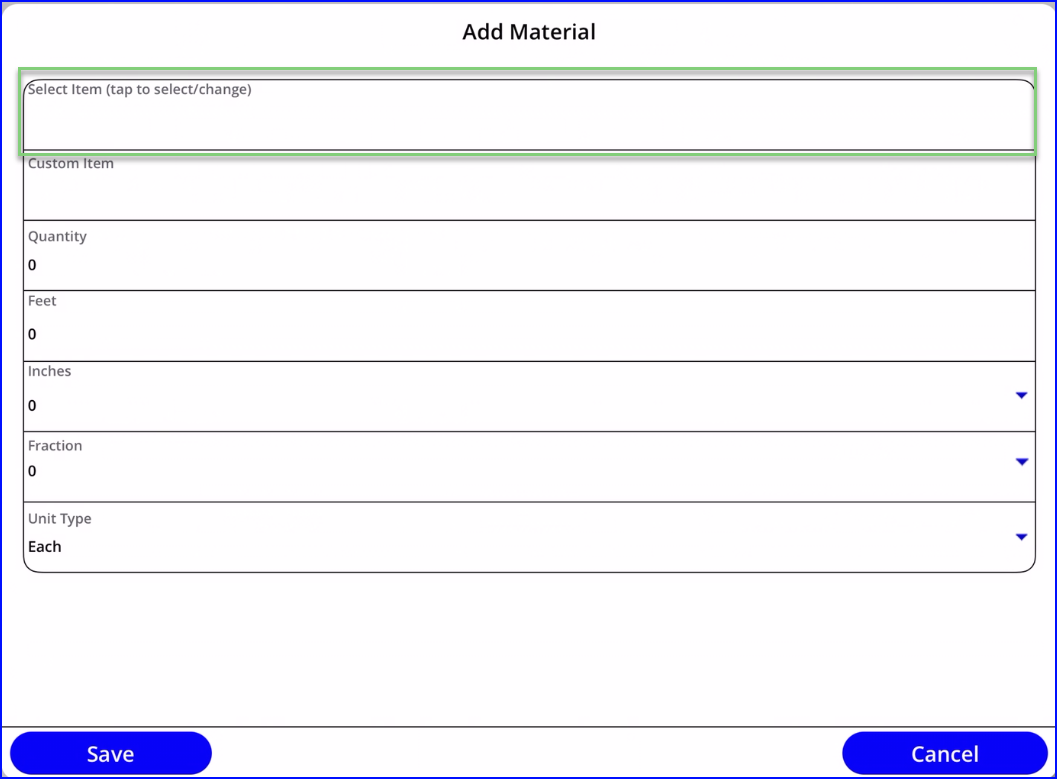
- Continue adding material with the green plus+
- Or Close Details to save changes and leave ticket open
- Or, tap Next or Skip to Sign to continue on to getting the ticket signed
Signatures on the Mobile Device
When all extra work is captured and you are ready to get the GC's signoff, the last step is the signature step:
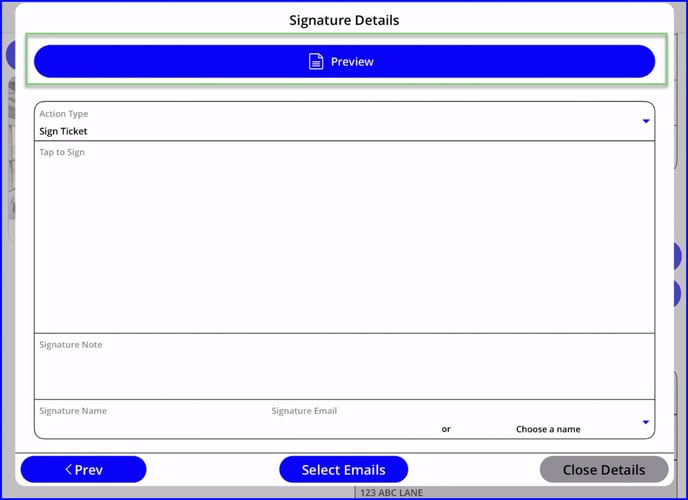
- If the GC is able to sign in person, you can show them a Preview with all the ticket info
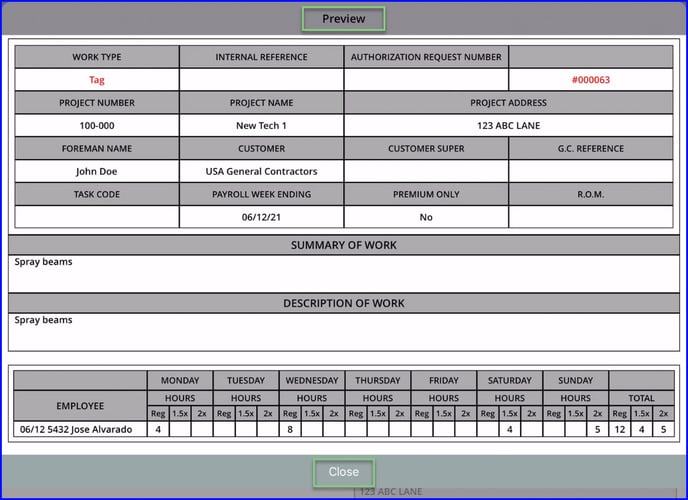
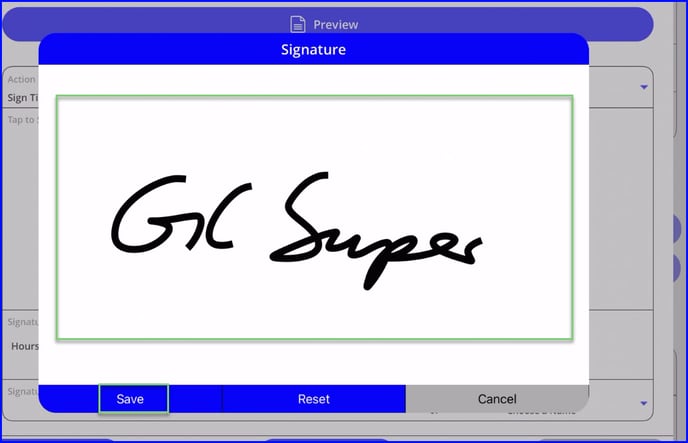
- Then simply close the preview and tap in the "Tap to sign" signature area for them to sign on the mobile
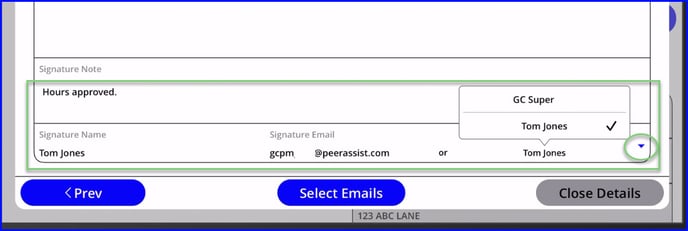
- They can add a note below their signature
- Select the signer from the dropdown which is pre-populated with the GC team members, or add the signers name and email manually (if the signer isn't in the GC project team list then ask your admin or the PM to add them for future signatures)
- The signer will receive a copy of the signed ticket thru email
- Close Details to save changes without sending the confirmation email
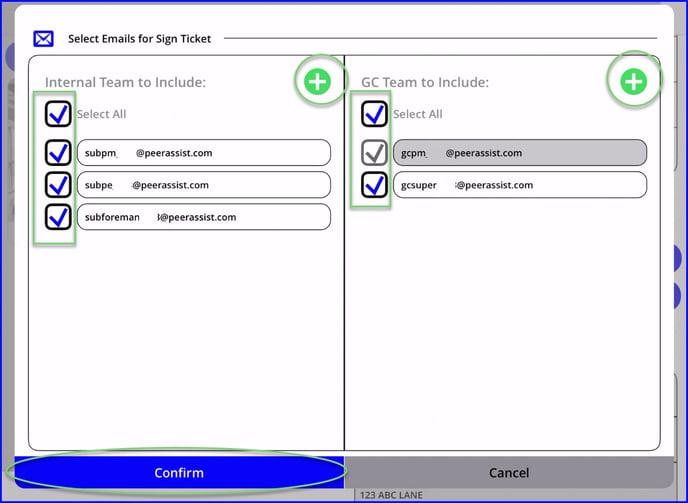
- Or Select Emails to close out the ticket and notify the team members
- Select/deselect and +Add people to the distribution as needed
- Confirm to send and close the ticket
- Don't forget to Save and Refresh to sync with the office
Other Signature Options
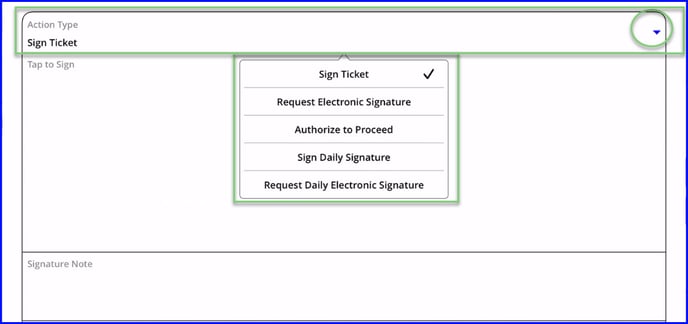
If you tap in the Action Type, there are some other signature options available to you
-
Sign Ticket - Capture a signature in person. The signer will sign on the mobile device.
-
Request Electronic Signature - Emails the ticket to the recipient with a link to sign or reject remotely - learn more here.
-
Authorize to Proceed - This only applies to a project that requires a field signature before proceeding to track labor and material if you didn't first create an authorization request
-
Sign Daily Signature - This daily signature option captures an in-person signature acknowledging work completed for the current day. This leaves the ticket open so you can continue adding time & material.
Daily Signatures are turned on from the desktop version. If the GC is requesting to sign tags daily, please ask your Admin to turn on that feature at the project level
- Request Daily Electronic Signature - This allows you to request the daily signature electronically thru email. This will not close the ticket.
Multiple Signatures
If multiple signatures are required, the admin should set the number of required signatures at the project level. Then the foreman can capture the signatures on the mobile or via email - learn more here.
Save and Refresh
After creating a ticket, you will return to the project dashboard Ticket tab.
- The blue arrows are a reminder to Save and Refresh (in the top right corner)
- The red X allows you to delete a new ticket
- You can also access the Ticket Library to view tickets that have been signed and are no longer available on the dashboard (this requires a data/wifi connection).
- Toggle through other tabs as needed or tap to go <Back to Project List
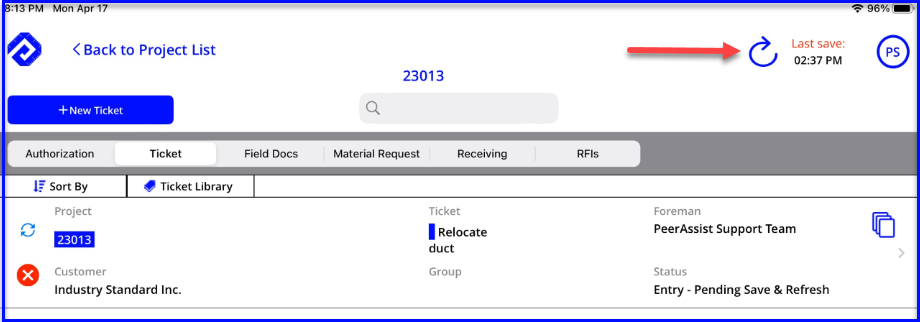
The mobile app is built so that you work offline when you don't have a connection. Any changes made are saved to the device until you tap the round arrow to Save and Refresh and update the office with new activity. This will also pull in any changes made on the office side. This can be done from the project list or the project dashboard.
Visit our FAQs for lots of helpful T&M tips!

