
Learn all about monitoring T&M in progress, and pricing and sending Change Order Requests.
Table of Contents
- Field Work in Progress overview
- Ticket Steps
- View Ticket Details
- Connect a Ticket to a PlanGrid Task
- Add labor and material to a ticket in Entry
- Sending Tickets for Signature
- Pricing Tickets
- Sending Change Order Requests
- Grouping Tickets on a Change Order Request
- General Notes
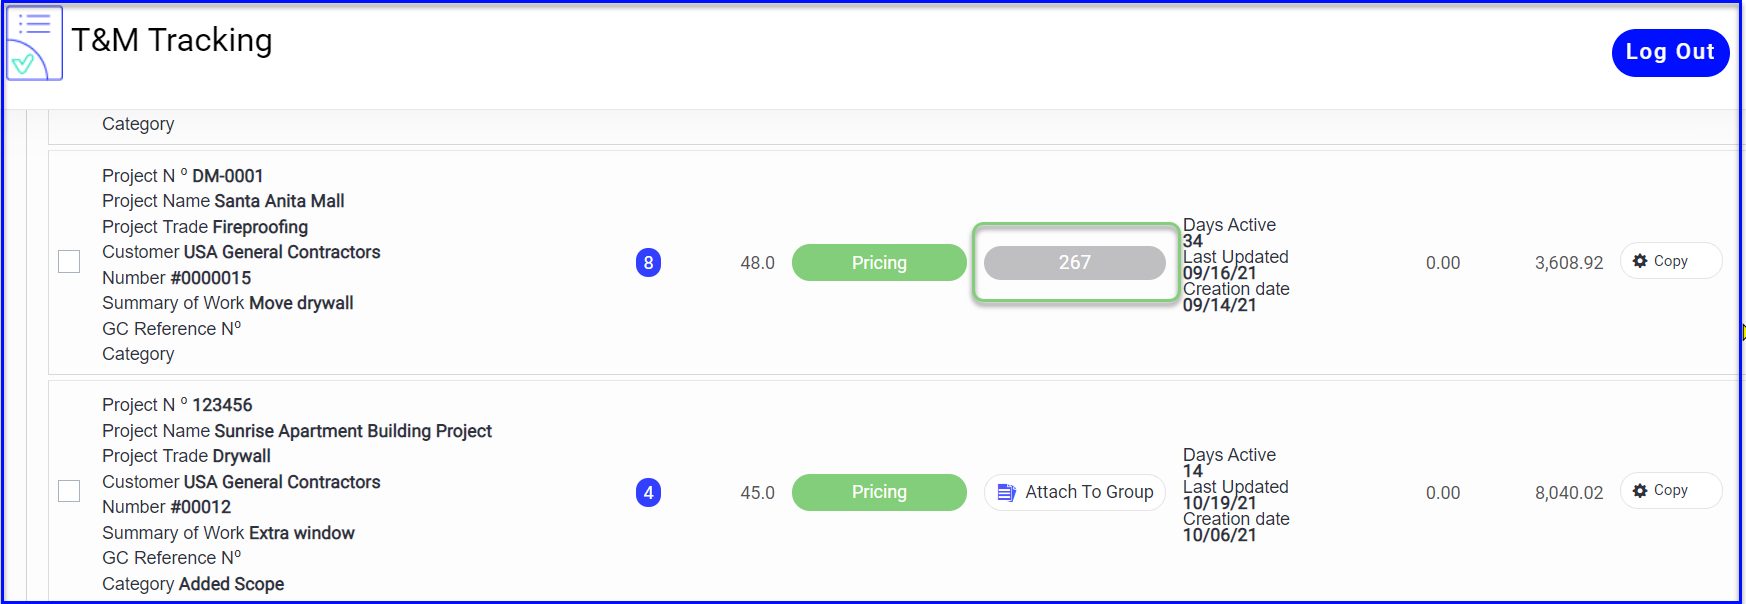
Field Work in Progress display
The Field Work in Progress tab gives you a lot of information at-a-glance:

- Project Name/Number and GC
- Ticket number, description, categories and reference numbers, as applicable
- PlanGrid connection, if applicable
- The project team members (if you hover over the # you can view team members)
- Labor hours currently being tracked
- The step the ticket is in - more on that below
- The group the ticket is attached to, if applicable
- The dates the ticket was created, last updated, and days active
- A ROM amount, if entered
- An Amount based on current hours and materials being tracked
- View the ticket or COR PDF with the icon on the right hand side
Ticket Steps
- You can view what step the ticket is in from the Field Work in Progress dashboard.
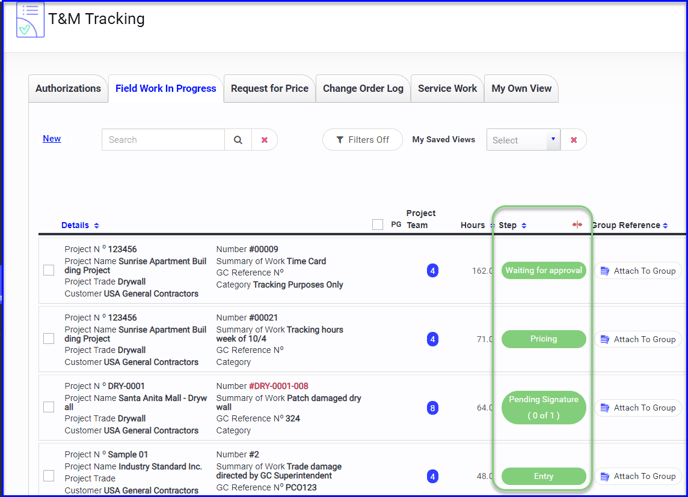
- The various steps are as follows
Entry The extra work is currently underway the foreman is logging labor and materials
Pending Signature The extra work has been completed and has been sent electronically to the GC for signature. The office can resend the electronic signature request as needed.
Pricing The extra work has been completed and the GC has signed the ticket and is ready to be priced.
Waiting for Approval The extra work has been priced and is ready to be issued on a Change Order Request
Pending Changes When the GC rejects a request for change order and needs some changes to the pricing, it will move into this step (this applies if the GC is also using the platform)
View Ticket Details
- To open any ticket, click on the green button indicating which step it is in
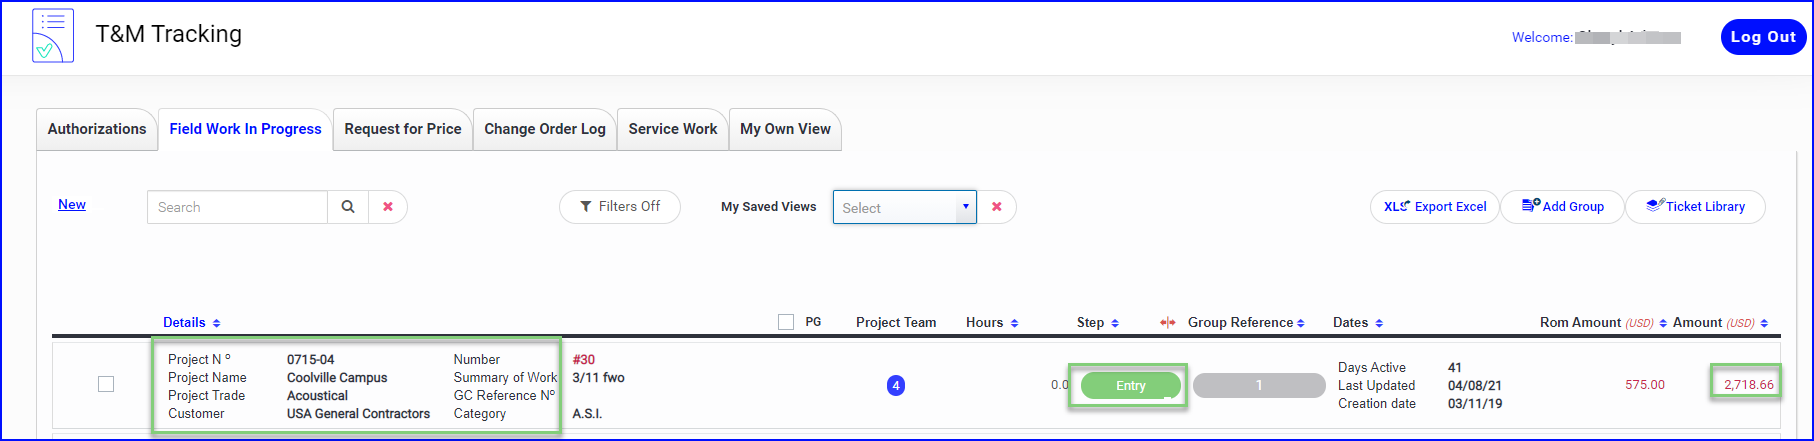
- If a ROM was given for the work, you can enter it here and will be tracked next to the actual cost on the dashboard
- Enter the GC Reference# if it is not already populated (optional)
- Use the Categories to quickly filter tickets by type of work, area, RFI# etc. You can choose a category from the list or add a new one
- Use the Internal Reference as needed, for example to separate work by phase or location etc.(this is filterable)
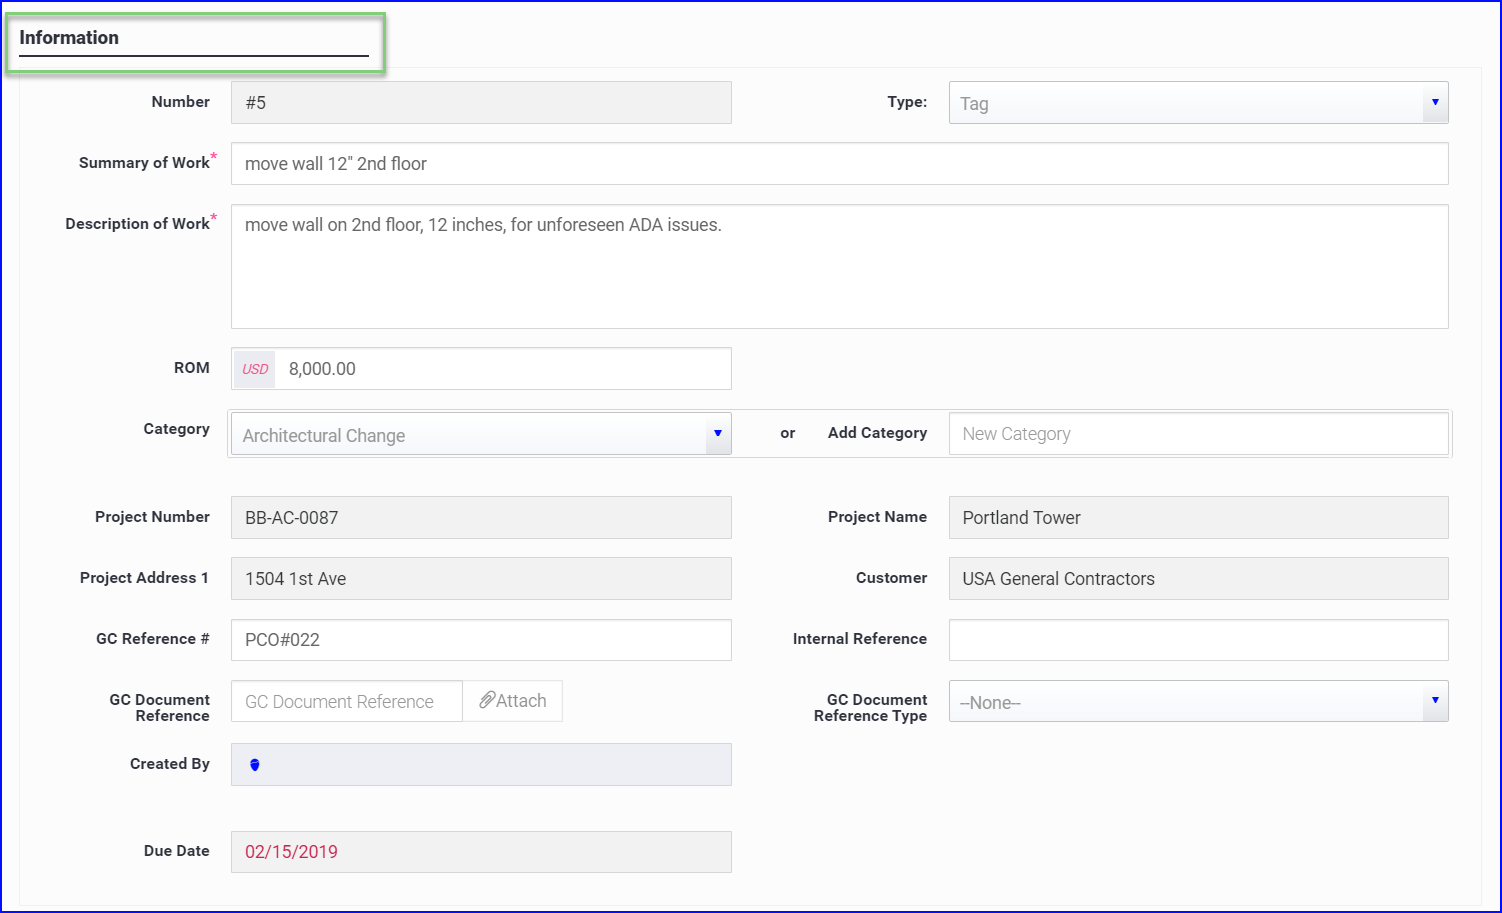
Ticket Information
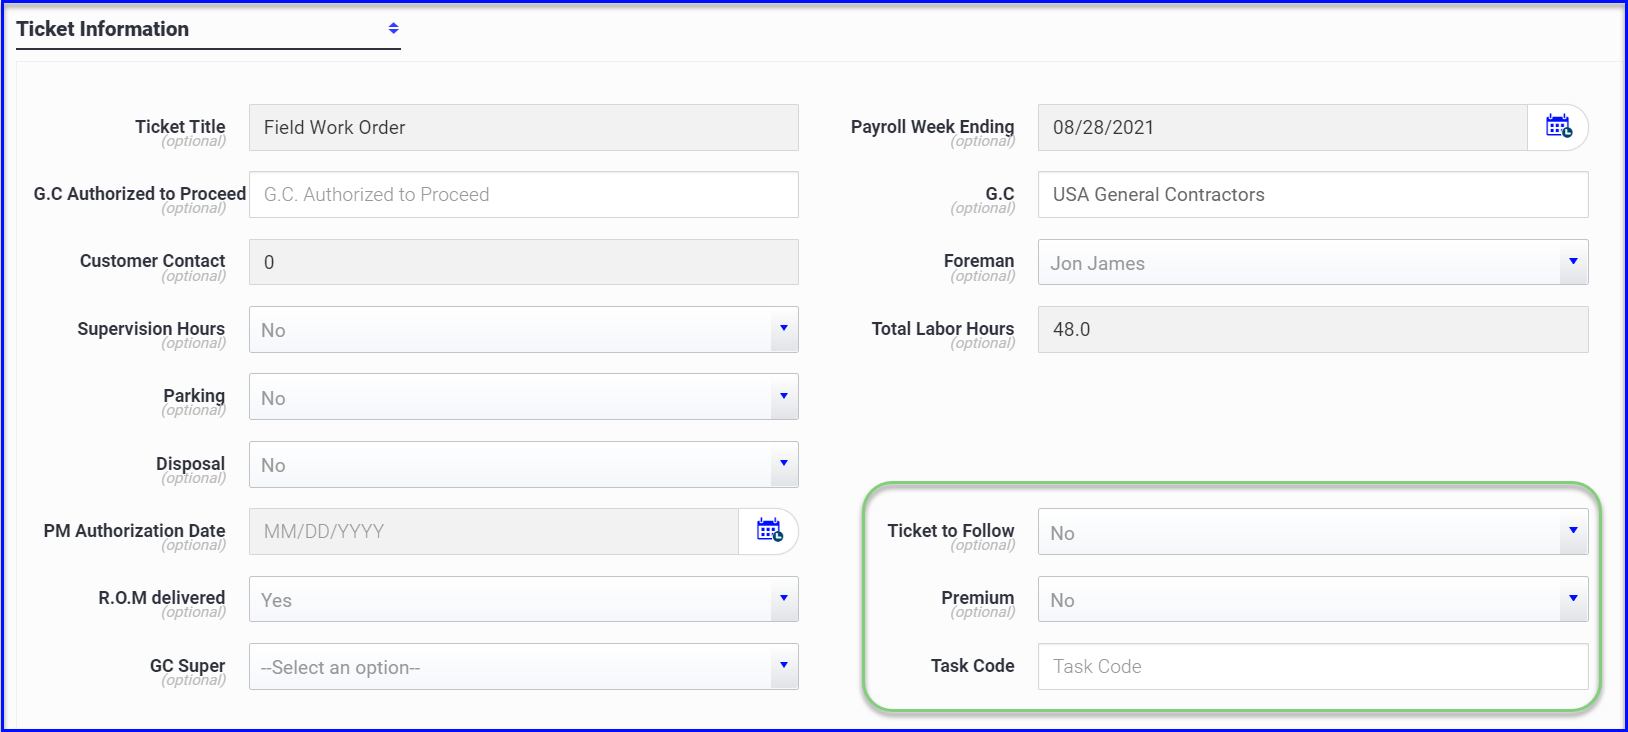
Additional ticket details are displayed in the ticket information.
- Indicate if the work is ongoing and there will be additional tickets
- Indicate if the work is for Premium Time, this will calculate the labor at the premium time rate
- Add a task code for tracking purposes if desired. You can include the task code when exporting reports.
Premium Time is the difference between overtime and straight time. If the field is performing contract work and the GC has agreed to pick up the overtime (or you are tracking the overtime on a "tracking only" ticket), the PM can use this setting to bill for the difference. You can set the Premium Time rate at the company level or at the project level.
PlanGrid Connection
-
If you have connected the project to your PlanGrid project, you can link the ticket to a PlanGrid task.
-
If the ticket is already linked to a PlanGrid task, you can view the task details within the ticket. Any changes made to the task in PlanGrid will sync to the project & ticket.
- Read more about connecting to PlanGrid here.

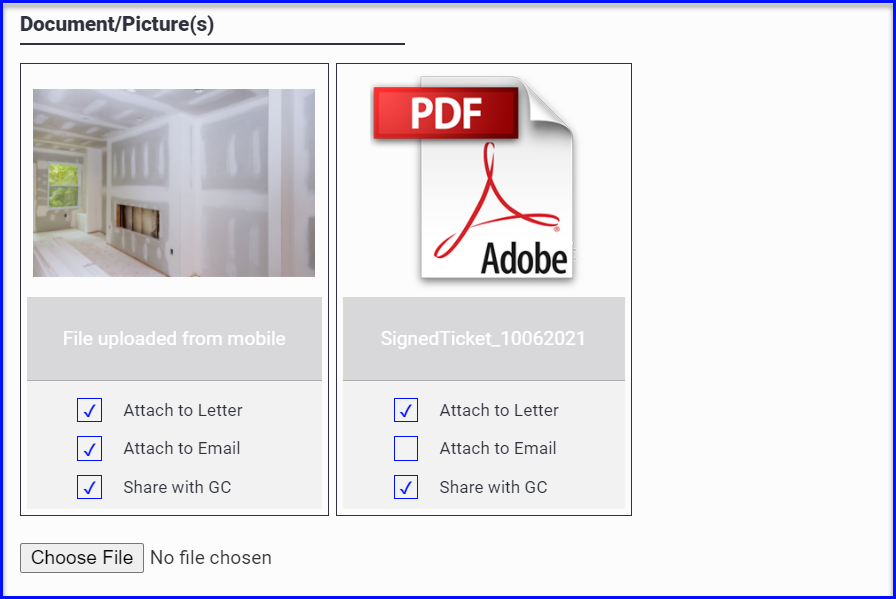
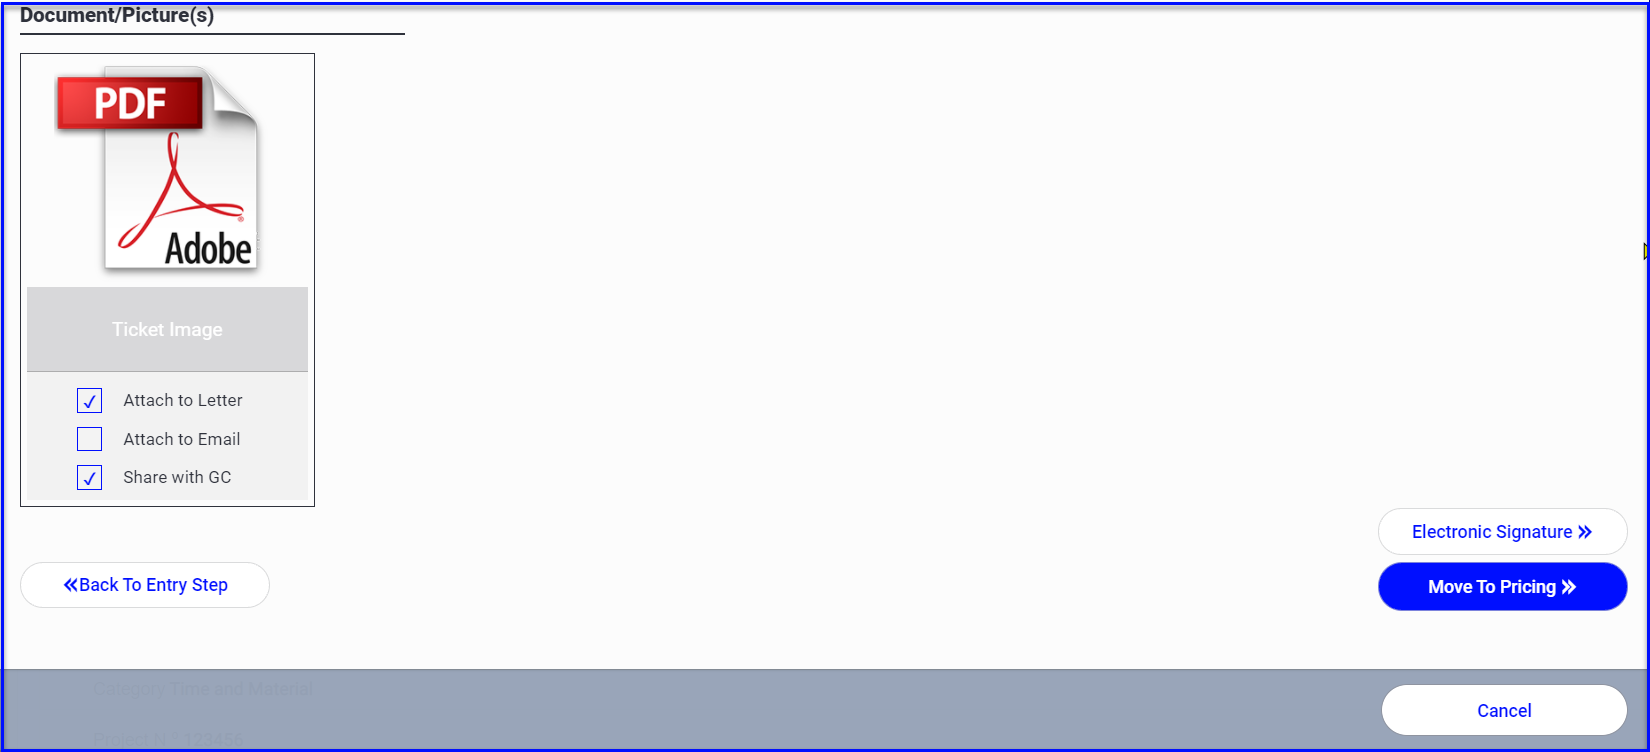
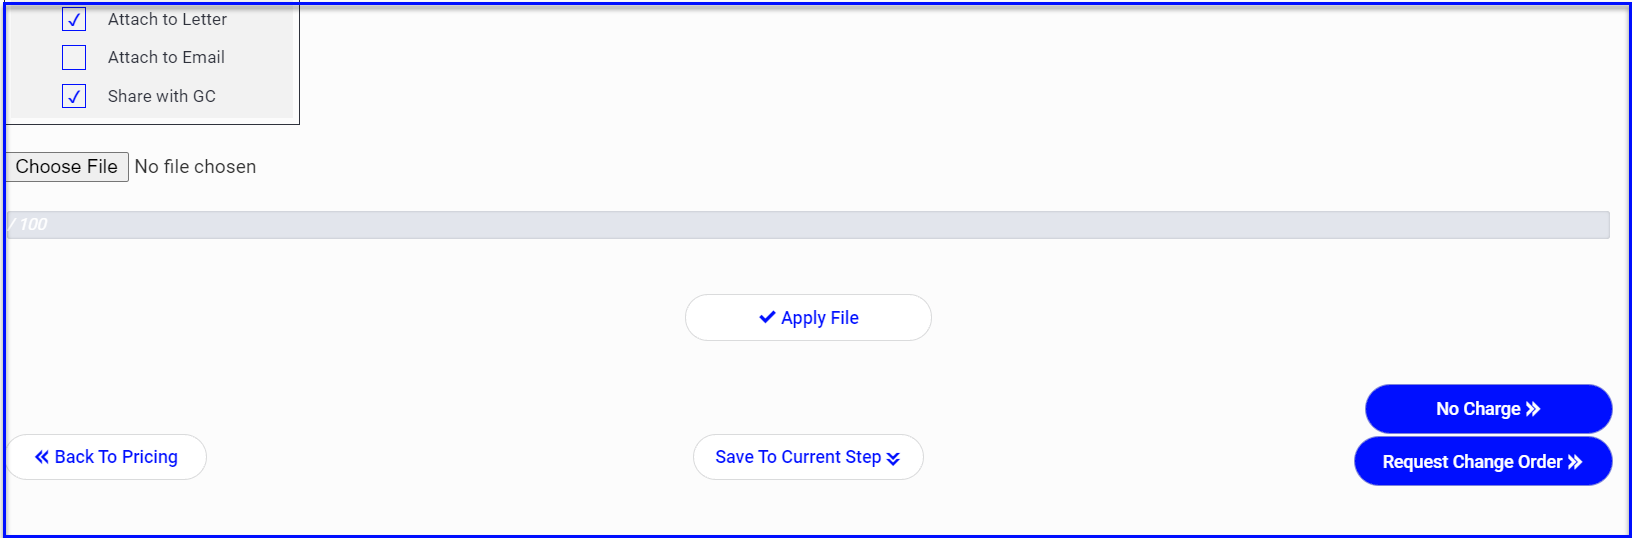
Photos and Backup
- Photos added in the field will be visible within the ticket, and photos can be added form the office end (Choose file and Apply to upload photos).
- A PDF of the ticket can be viewed and will refresh each time changes are made. Click Regenerate to force the PDF to refresh.
- If the ticket is linked to a PlanGrid task, photos from PlanGrid tasks will be visible here
- Use the checkboxes to indicate if you would like the document added to the email and/or Change Order Request letter, or shared with the GC if the GC is using the platform also
Add Labor & Materials to a Ticket in Entry
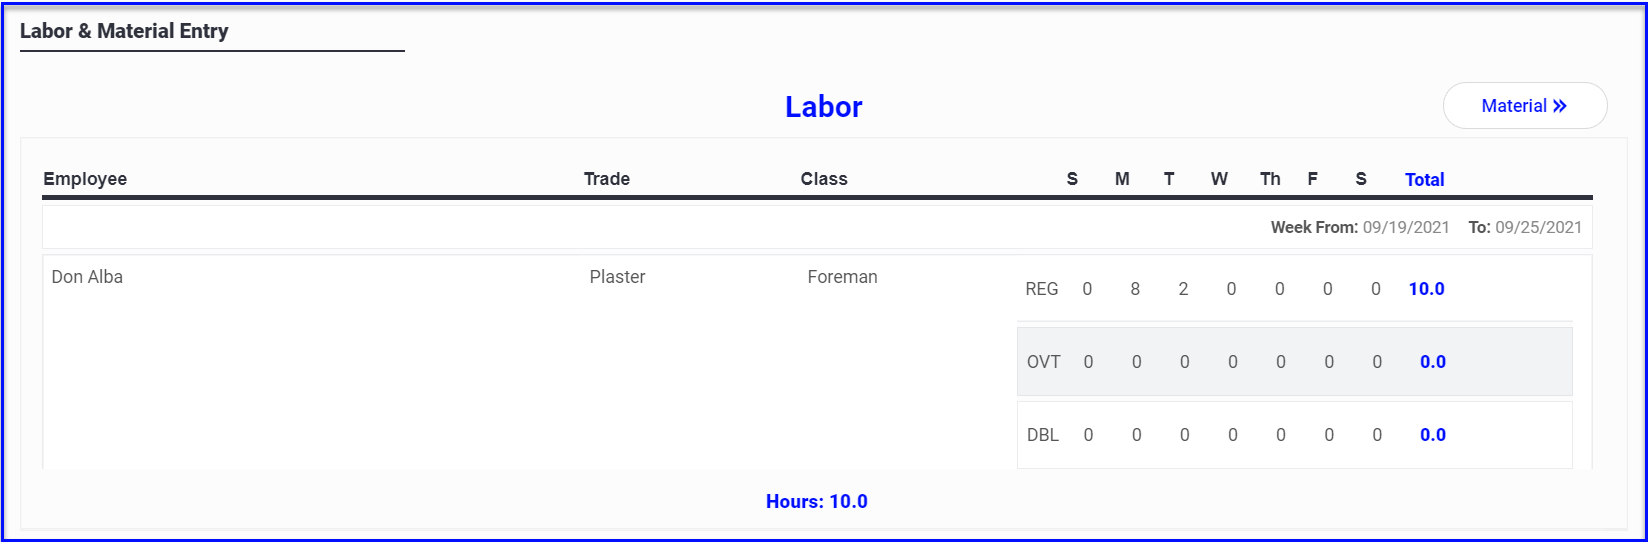
- The PM can view the labor and materials added to the ticket in the field, and add or edit labor and materials as needed.
- Use the green + to add labor
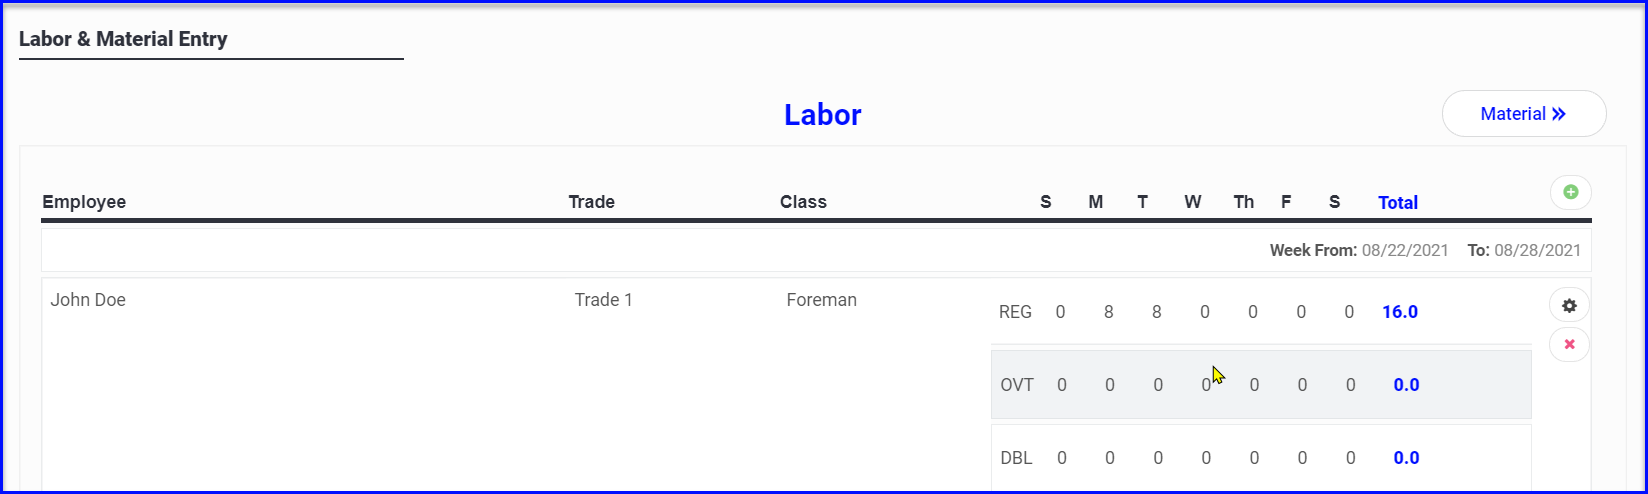
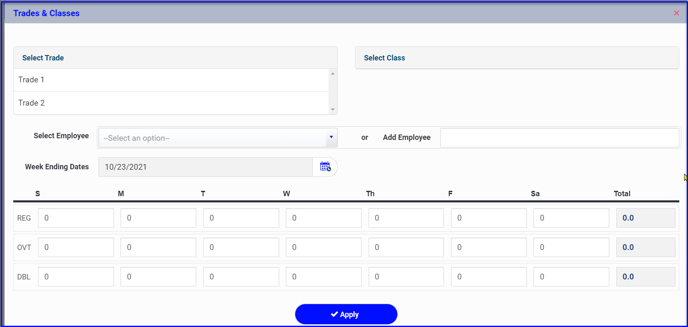
- Select the person's trade on the left, and class on the right
- Select their name from the dropdown list, or key it in manually (you can name the line however is appropriate if you do not put workers' names on a tag, eg. Journeyman Time)
- Set the week-ending date
- Enter the hours for the appropriate day
- Click Apply and continue adding labor needed before Saving changes
The rates billed are tied to the trade and class selected and not the employee.
Review adding employees here.
Review adding company default labor rates here.
Review adding project specific labor rates here.
To add material to a ticket in Entry, toggle to the material button and use the green +
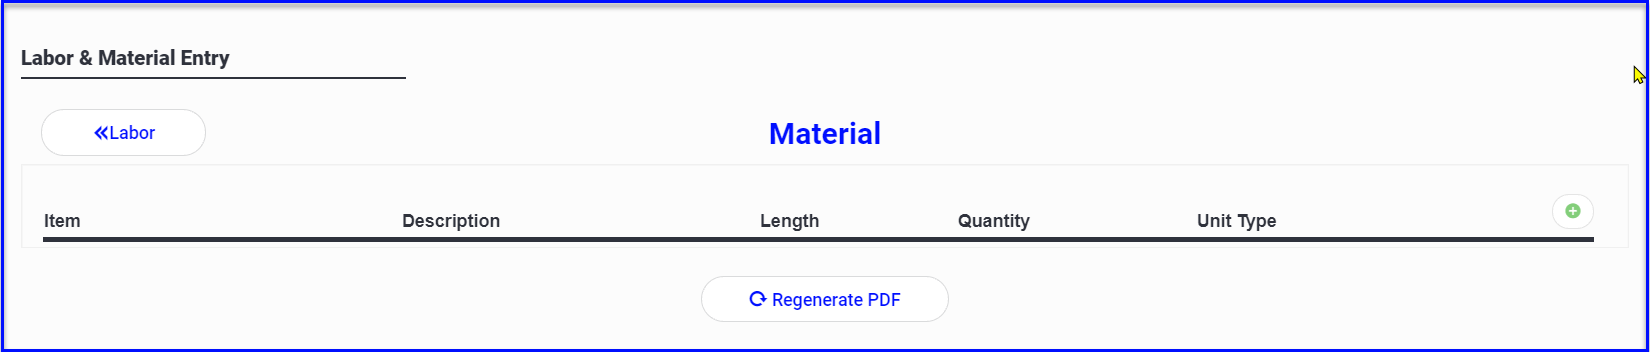
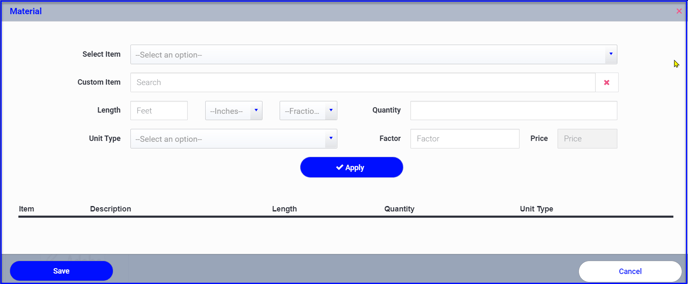
- Either Search by Group, Search by Text, or add an item manually in the Custom Item line.
- Adjust quantities, units and details as needed
- Click Apply and continue adding materials as needed, Save changes
Review uploading a default material list for the company here.
Review uploading a project specific material list here.
Tickets Pending Signature
- When a ticket is Pending Signature it is locked and labor and materials cannot be changed
The PM has the option to:
- Return To Entry Step so the foreman or PM can continue adding time and materials
- Send to the GC for Electronic Signature
- Move To Pricing if a signature is not needed (for example if the GC approved the ticket in writing in an email)
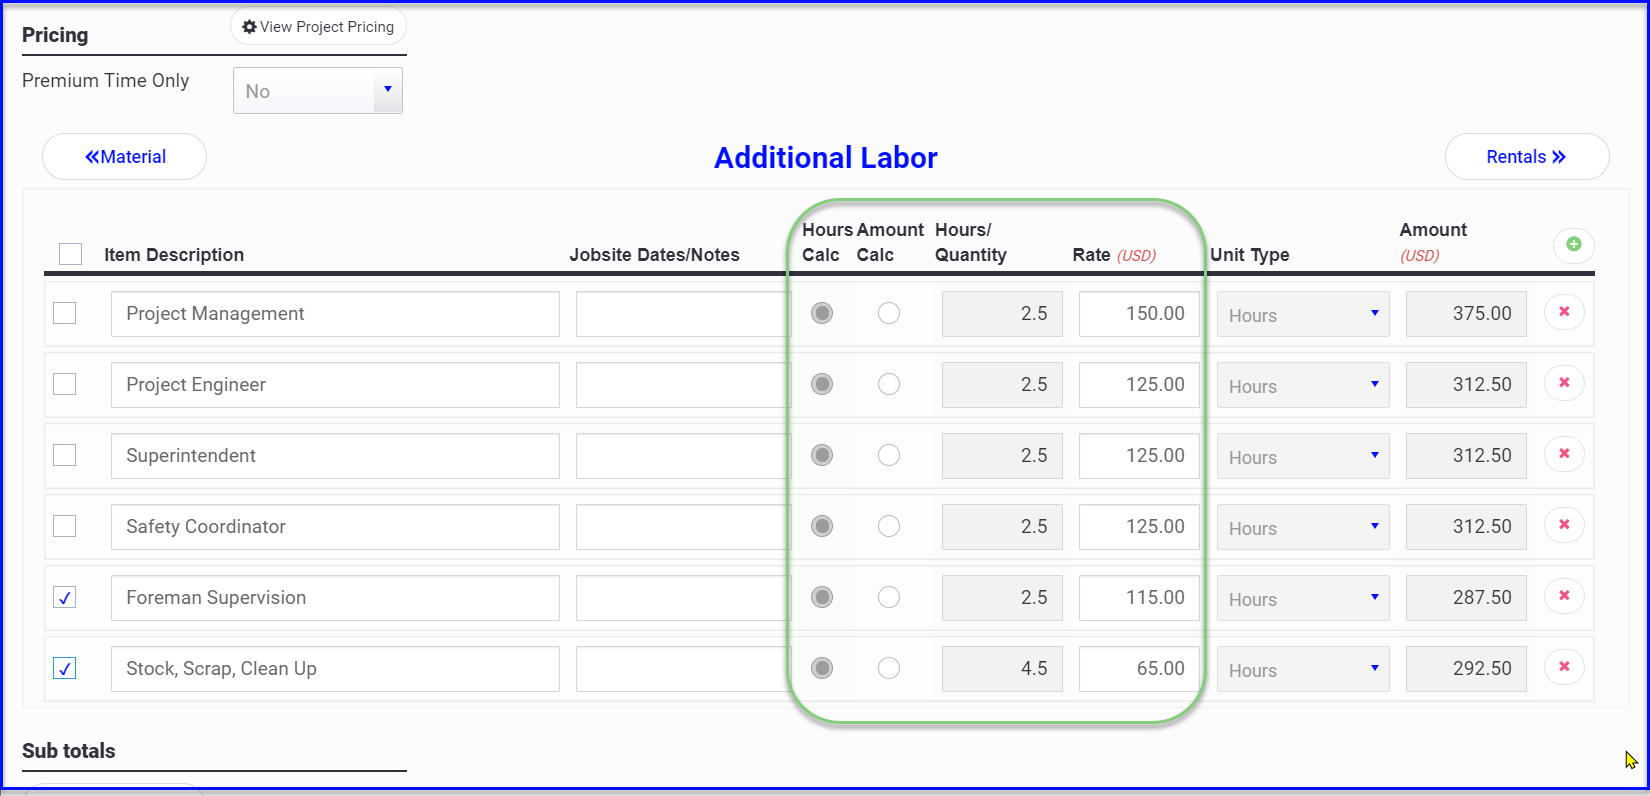
Tickets in the Pricing Stage
- Once a ticket is signed or moved to the Pricing step, the office can review and capture any additional costs related to the extra work using the billing template set up at the company level or at the project level.
- Tab through the categories left to right and click to add applicable items.
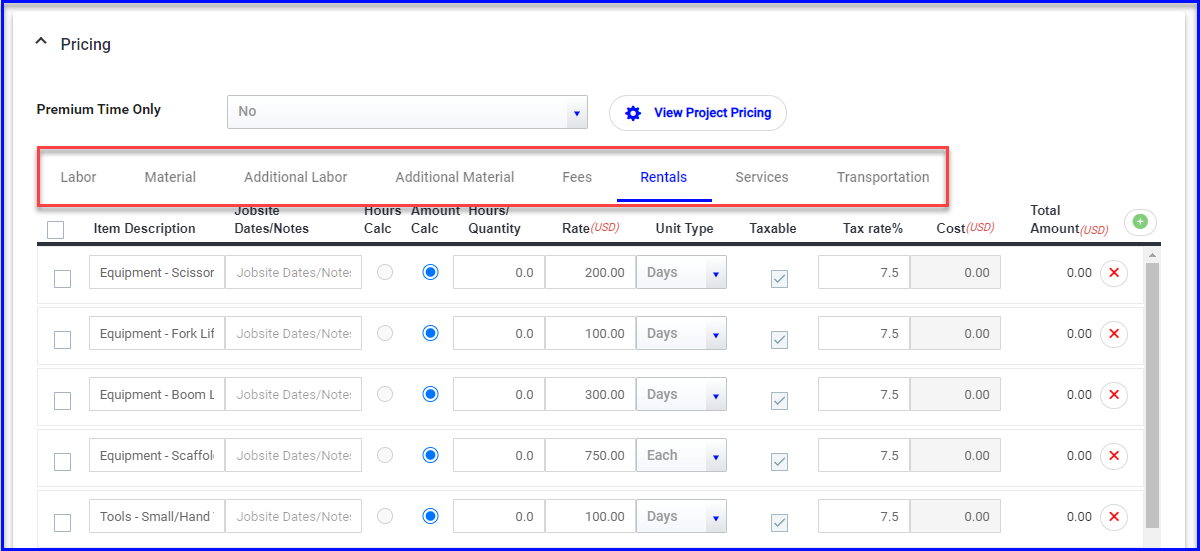
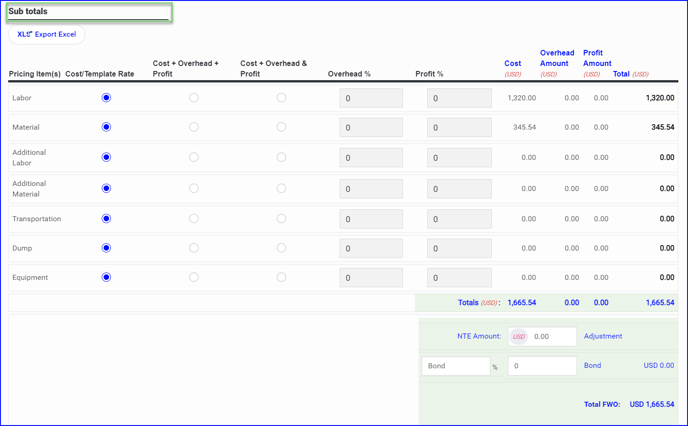
- As items are marked off, the totals will update in the Sub totals below
- Some items will give you the option of charging a flat price (Amount Calc) or will calculate based on the ticket hours (Hours Calc, e.g. 1hr supervision per 8 ticket hours at the supervision pre-determined rate, you can override with a different rate as needed).
- Use the green plus to add a line and customize the description/amount as needed
-
Review your billing breakdown and either
-
Save your work and the ticket will remain in the Pricing step
-
Move to Approve will move it to the Waiting for Approval step for another team member to reviewing and/or send the COR
-
All tickets in a group will need to be in the Waiting for Approval step before the COR can be sent
-
- Request Change Order to send the COR to the customer if no other review/approval is needed
- No Charge is for when you are not billing the customer and will move the ticket to the Change Order Log as "No Charge" and the cost will not be reflected on the CO Log Report.
-
Sending Change Order Requests
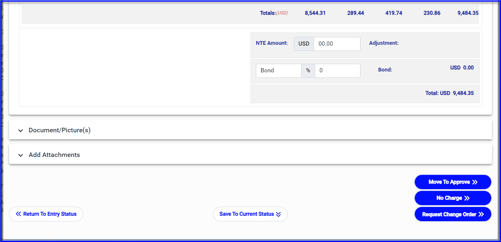
- Tickets in the Waiting for Approval step are priced and ready to be sent as a Change Order Request. During this step the ticket pricing can be further modified
- The ticket can be sent Back to Pricing if needed
- The ticket can be marked No Charge if the GC will not be billed and you want to move the ticket out of "Field Work in Progress" (the cost show as No Charge on the Change Order Log)
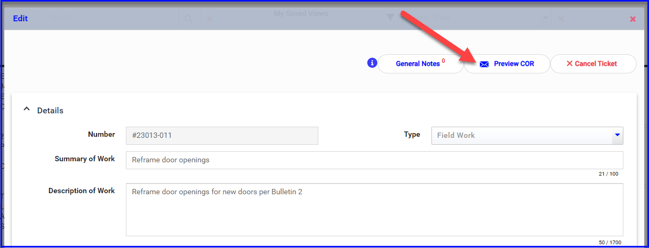
- Select Preview COR at the top of the window to Preview the Change Order Request package and Edit the cover letter if needed
- Select Request Change Order at the bottom of the window to issue a Change Order Request
- You will be prompted to select who is copied on the email, and you can customize the email message
Grouping Tickets on a Change Order Request
Tickets in any step can be grouped and sent in one change Order Request from the Field Work in Progress dashboard
- Add Group to start a new group and associate it with a project, or
- Locate the ticket and Attach to Group - select group from a dropdown or add new group
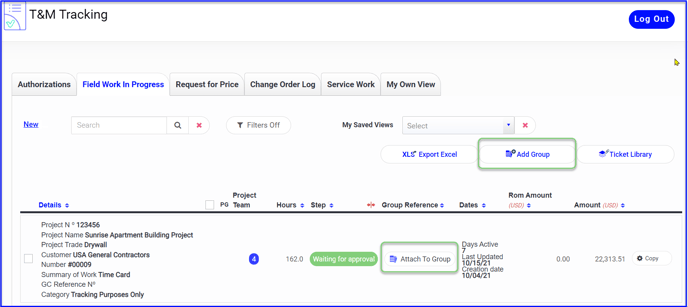
- You will be able to view all tickets for that project and check off which to include in the group
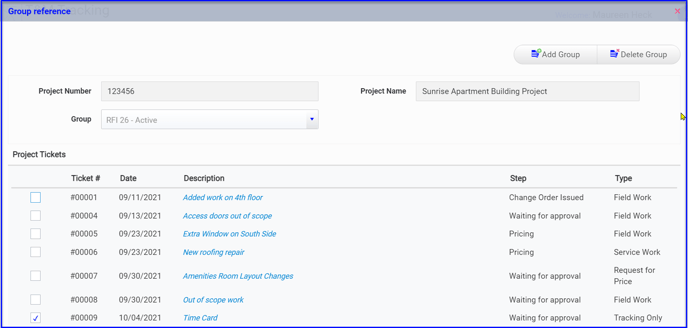
- Once a ticket is attached to a group, the group will be displayed on the dashboard view
- If you click on the group number, you can view, add, or remove tickets from the group
All tickets in the group must be in Waiting for Approval stage in order to create the Change Order Request.
You can select if the Change Order Request shows grouped tickets in a lump sum (Summary) or itemized (Detailed) on the cover letter in the Project settings.
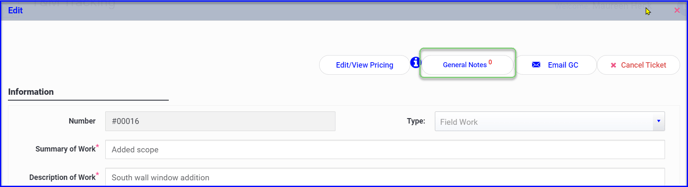
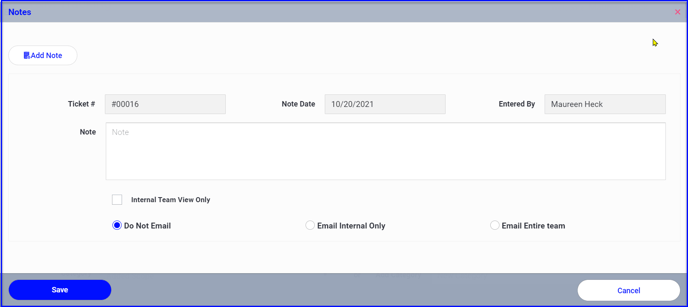
General Notes
You can keep notes for internal reference or to be shared with the GC if they are also on the PeerAssist platform. This is helpful to document communication with the field or GC while the ticket is in progress.
Refer back to the article anytime for assistance processing tickets.
You can use these links to navigate the page using the links below.
- Field Work in Progress overview
- Ticket Steps
- View Ticket Details
- Add labor and material to a ticket in Entry
- Sending Tickets for Signature
- Pricing Tickets
- Sending Change Order Requests
- Grouping Tickets on a Change Order Request
- General Notes